Translate

Total Pageviews

My YouTube Channel

Tuesday, 25 June 2013

Types of supported Virtual Disks on ESX/ESXi hosts (1022242)

Purpose

This article provides an overview of the types of virtual disks supported by ESX/ESXi.

Resolution

The supported disk formats in ESX are:
  • zeroedthick (default) – Space required for the virtual disk is allocated during the creation of the disk file. Any data remaining on the physical device is not erased during creation, but is zeroed out on demand at a later time on first write from the virtual machine. The virtual machine does not read stale data from disk.
  • eagerzeroedthick – Space required for the virtual disk is allocated at creation time. In contrast to zeroedthick format, the data remaining on the physical device is zeroed out during creation. It might take much longer to create disks in this format than to create other types of disks.
  • thick – Space required for the virtual disk is allocated during creation. This type of formatting does not zero out any old data that might be present on this allocated space. A non-root user cannot create disks of this format.
  • thin – Space required for the virtual disk is not allocated during creation, but is supplied and zeroed out, on demand at a later time.
  • rdm – Virtual compatibility mode for raw disk mapping.
  • rdmp – Physical compatibility mode (pass-through) for raw disk mapping.
  • raw – Raw device.
  • 2gbsparse – A sparse disk with 2GB maximum extent size. You can use disks in this format with other VMware products, however, you cannot power on sparse disk on a ESX host till you reimport the disk with vmkfstools in a compatible format, such as thick or thin.
  • monosparse – A monolithic sparse disk. You can use disks in this format with other VMware products.
  • monoflat – A monolithic flat disk. You can use disks in this format with other VMware products.
Use these commands to create a virtual disk:
 
vmkfstools
-c --createvirtualdisk <size>[kK|mM|gG]
-a --adaptertype [buslogic|lsilogic] <srcfile>
-d --diskformat [thin|zeroedthick|eagerzeroedthick]

Source:-

Monday, 24 June 2013

Changing the thick or thin provisioning of a virtual disk (2014832)

Purpose

This article provides steps to change the provisioning of a virtual disk from thick to thin, or from thin to thick. The procedure uses the vSphere Client and vCenter Server to perform this task.

Resolution

Note: Before following these procedures, VMware highly recommends that you have a valid backup of the virtual machine and enough space to convert the virtual machine's disk(s) from thin to thick.

To change the provisioning of a virtual machine base disk from thin to thick from the Datastore Browser:
  1. Power off the virtual machine.
  2. In vSphere Client, right-click the virtual machine in the inventory.
  3. Click Edit Settings to display the Virtual Machine Properties dialog box.
  4. Click the Hardware tab and select the appropriate hard disk in the Hardware list.

    Note: The Disk Provisioning Type section on the right displays either Thin Provision or Thick Provision. If the disk provision type is Thick, disk provisioning has already taken place. In this case, the disk provisioning is Thin.
  5. Click Cancel to exit out of Virtual Machine Properties dialog box.
  6. Click the Summary tab of the virtual machine.
  7. Under Resources, right-click the datastore where the virtual machine resides and click Browse Datastore.
  8. Double-click the virtual machine folder to display the  .vmdk file.
  9. Right-click the .vmdk file, and click Inflate. The Inflate option converts the disk to thick provisioned.
Notes:
  • If the Inflate option is grayed out, this may indicate that the virtual machine is not powered off or that it is not thin provisioned.
  • There should be no snapshots and the conversion is performed on the base disk.

To convert a virtual machine base disk from thick to thin provisioning by changing the datastore and using offline virtual machine migration:
  1. Power off the virtual machine.
  2. Right-click the virtual machine, and click Migrate.
  3. Click Change datastore.
  4. Click Next, and select a datastore that is not the same as the current datastore.
  5. From the dropdown, select the Thin Provision virtual disk format.
  6. Click Next, then Finish.
Note: This process requires more than one datastore. If only a single datastore exists, you can clone the virtual machine to a destination machine with thin provisioned disks instead of migrating.
Source:-

Thursday, 20 June 2013

Multipathing policies in ESXi 5.x and ESXi/ESX 4.x (1011340)

Purpose

This article describes the various pathing policies that can be used with VMware ESXi 5.x and ESXi/ESX 4.x.

Note: These are referred to as Path Selection Plug-ins (PSP), and are also called Path Selection Policies.

Resolution

These pathing policies can be used with VMware ESXi 5.x and ESXi/ESX 4.x:

  • Most Recently Used (MRU): Selects the first working path, discovered at system boot time. If this path becomes unavailable, the ESXi/ESX host switches to an alternative path and continues to use the new path while it is available. This is the default policy for Logical Unit Numbers (LUNs) presented from an Active/Passive array. ESXi/ESX does not return to the previous path if, or when, it returns; it remains on the working path until it, for any reason, fails.

    Note: The preferred flag, while sometimes visible, is not applicable to the MRU pathing policy and can be disregarded.
  • Fixed (Fixed): Uses the designated preferred path flag, if it has been configured. Otherwise, it uses the first working path discovered at system boot time. If the ESXi/ESX host cannot use the preferred path or it becomes unavailable, the ESXi/ESX host selects an alternative available path. The host automatically returns to the previously-defined preferredpath as soon as it becomes available again. This is the default policy for LUNs presented from an Active/Active storage array.
  • Round Robin (RR): Uses an automatic path selection rotating through all available paths, enabling the distribution of load across the configured paths.

    • For Active/Passive storage arrays, only the paths to the active controller will be used in the Round Robin policy.
    • For Active/Active storage arrays, all paths will be used in the Round Robin policy.

    Note: This policy is not currently supported for Logical Units that are part of a Microsoft Cluster Service (MSCS) virtual machine.
  • Fixed path with Array Preference: The VMW_PSP_FIXED_AP policy was introduced in ESXi/ESX 4.1. It works for both Active/Active and Active/Passive storage arrays that support Asymmetric Logical Unit Access (ALUA). This policy queries the storage array for the preferred path based on the array's preference. If no preferred path is specified by the user, the storage array selects the preferred path based on specific criteria.

    Note: The VMW_PSP_FIXED_AP policy has been removed from ESXi 5.0. For ALUA arrays in ESXi 5.0, the MRU Path Selection Policy (PSP) is normally selected but some storage arrays need to use Fixed. To check which PSP is recommended for your storage array, see the Storage/SAN section in the VMware Compatibility Guide or contact your storage vendor.
Notes:
  • These pathing policies apply to VMware's Native Multipathing (NMP) Path Selection Plug-ins (PSP). Third-party PSPs have their own restrictions.
  • Round Robin is not supported on all storage arrays. Please check with your array documentation or storage vendor to verify that Round Robin is supported and/or recommended for your array and configuration. Switching to a unsupported or undesirable pathing policy can result in connectivity issues to the LUNs (in a worst-case scenario, this can cause an outage).

Warning: VMware does not recommend changing the LUN policy from Fixed to MRU, as the automatic selection of the pathing policy is based on the array that has been detected by the NMP PSP.

Additional Information

Source:-

Virtual network adapters that support jumbo frames (1015556)

Details

This article provides information on products and adapters that support jumbo frames.

Solution

Jumbo frames are supported in these configurations:

 
ProductSupported Adapter
ESX/ESXi 4.0.xvmxnet2 (enhanced vmxnet) or vmxnet3
ESX/ESXi 4.1.xe1000, vmxnet2 (enhanced vmxnet) or vmxnet3
ESXi 5.xe1000, vmxnet2 (enhanced vmxnet) or vmxnet3
 
Source:-

Tuesday, 11 June 2013

vSphere Client shows VMware Tools as Unsupported (2011350)

Symptoms

After upgrading vCenter Server 4.1 to 5.x with ESXi/ESX hosts still running on version 4.1, the status of VMware Tools for virtual machines is reported as Running (Unsupported). 

Cause

The VMware Tools status information comes from the vmx process (which is responsible for running the virtual machine) and can change only if the ESXi/ESX host is upgraded with a newer VMware Tools distribution.

Note: There has been a change in the VMware Tools status with vSphere 5.x.

Resolution

To resolve this issue, use the UI hint information for the various VMware Tools status messages.

To view the UI hint information:

  1. Click the virtual machine.
  2. Click on the Summary tab.
  3. Hover the mouse over the VMware Tools current value in the General box. You see a text box that shows the current UI hint information.
This table lists the various VMware Tools status message and the corresponding UI hint:

StatusInternal values (VMODL)UI valuesUI hint
GreenguestToolsCurrentCurrentVMware Tools is installed and the version is current.
guestToolsSupportedNewCurrentVMware Tools is installed and the version is current.
YellowguestToolsSupportedOldOut-of-dateOK. This version is supported on the existing host, but upgrade if new functionality does not work.
RedguestToolsNotInstalledNot InstalledInstall VMware Tools. See the vSphere Client Help.
guestToolsTooOldUnsupportedUpgrade or reinstall VMware Tools. This version is not supported on the existing host. See the vSphere Client Help.
guestToolsNeedUpgradeUnsupportedUpgrade or reinstall VMware Tools. This version is not supported on the existing host. See the vSphere Client Help.
guestToolsBlacklistedErrorUpgrade immediately to avoid possible corrupt code. See the vSphere Client Help.
guestToolsTooNewUnsupported new versionUninstall and reinstall this version of VMware Tools. This version is known to be too new to work correctly with this virtual machine. See the vSphere Client Help.
GrayguestToolsUnmanaged3rd-party/IndependentThe status is unknown. Tools are installed, but are not managed by VMware.
guestToolsNotRunning3rd-party/IndependentTools are installed but vmtoolsd was stopped using theinit.d script.
Source:-

Monday, 10 June 2013

Check All the Datastores Visible to ESXi Host from vSphere Web Client

Select ESXi Host --> Related Objects Tab --> Datastores


Add/Remove the Physical Adapter From vSwitch by Using vSphere Web Client

1. Select ESXi host --> Manage Tab --> Networking --> Select vSwitch --> Click on manage physical network adapters
2. Click on "+" or "x" to Add/Remove the Physical Adapter To/From your vSwitch


Wednesday, 5 June 2013

Enable HD Audio in vSphere 5


First step is to un-register the VM from vCenter.


Second, open up a PuTTy session to an ESX host and browse to your datastores and into your VM folder an do a vi vmname.vmx. Scroll all the way to the bottom and add the following lines (using i for insert):
sound.present = "true"
sound.allowGuestConnectionControl = "false"
sound.virtualDev = "hdaudio"
sound.fileName = "-1"
sound.autodetect = "true"

Before you add the next line, you need to verify an available PCI slot number. My example above used 34. In this demonstration, PCI slot numbers 33 and 34 are already in use, so I'll use PCI Slot number 35 (again using i for insert).
sound.pciSlotNumber = "35"


Press escape to exit and ZZ to write the changes

Now that we have added the new hardware via .vmx, browse the datastore and register the virtual machine into vCenter. Once the VM is back in vCenter, edit the settings of the VM and you will now see there is a new driver called HD Audio. This is Virutal Machine Hardware version 8


Here is hardware version 7.

So now what happens when you boot the VM? Windows does find the driver. I would expect that this would primarily be for VMware View environments, but it's just a guess.


Shout-out goes to William Lam over at virtuallyghetto.com for his help and he also uncovered a new virtual ethernet adapter called "e1000e" that I'm sure you will see him talk about soon.

After testing out a quick PCoIP session to this Windows 7 VM, found that sound DOES NOT WORK using the HD Audio playback device. I had to reset to the VMware Virtual Audio playback device to get sound working once again. My bet, this is for a future version of VMware View.

Tuesday, 4 June 2013

vSphere Storage Appliance (VSA) interoperability with vCenter Server(2039938)


Purpose

This article clarifies the interoperability between the vSphere Storage Appliance (VSA) and vCenter Server.

Resolution

The vSphere Storage Appliance (VSA) requires VMware vCenter Server to function.

It will not function with the VMware vCenter Server Appliance (sometimes referred to as the Linux vCenter, or the vCenter Appliance).

This applies to the VSA 1.x and 5.x releases.

Note: Future releases may or may not support interoperability with the vCenter Appliance. This article will be updated if there are any changes to this status.
Source:-

Upgrading vCenter Server Appliance from 5.0.x to 5.1 (2033990)

Purpose

This article provides steps to upgrade vCenter Server Appliance from 5.0.x to 5.1.

Resolution


vCenter Server Appliance 5.0.1 and 5.1 use PostgreSQL for the embedded database instead of IBM DB2, which was used in vCenter Server Appliance 5.0. 
If you use the embedded database with the vCenter Server Appliance, when you upgrade from 5.0 to 5.1, the embedded IBM DB2 database is migrated to a PostgreSQL database. The configuration state of your existing database is preserved and the schema is upgraded to be compatible with vCenter Server Appliance 5.1.
 
To upgrade vCenter Server Appliance from 5.0.x to 5.1:
  1. Deploy the new version of the vCenter Server Appliance. For more information, see Downloading and deploying the vCenter Server Appliance 5.x (2007619). The new appliance has a default network configuration, and the Virtual Center Server service is not configured and disabled.
  2. Connect to both the old and new appliances in separate browser windows. For Example:https://ip_address_of_vCenter_VM:5480.
  3. In the new appliance, start the vCenter Server Setup wizard, and accept the end user license agreement.
  4. In the new appliance, in the Configure Options panel, select Upgrade from previous version.
  5. (Optional) Configure the vCenter Server Appliance to use an external vCenter Single Sign On instance instead of the default embedded Single Sign On.

    1. Click Configure SSO.
    2. On the SSO Settings page, set SSO deployment type to external.
    3. Enter the information for the Single Sign On instance.

      Note: The external Single Sign On instance must be hosted on another vCenter Server Appliance. It cannot be hosted on a Windows machine.
  6. In the new appliance, click Next.
  7. In the old appliance, on the Appliance Upgrade tab, select source for the appliance role, and click Set role.
  8. In the old appliance, click Establish Trust.
  9. In the new appliance, copy the local appliance key.
  10. In the old appliance, paste the local appliance key into the Remote appliance key field, and click Import remote key.
  11. In the old appliance, copy the local appliance key.
  12. In the new appliance, paste the local appliance key into the Remote appliance key field and click Next.
  13. In the new appliance, click Next. 

    The new appliance shuts down the old appliance and assumes the network identity of the old appliance. If the old appliance was configured to use dynamic addressing, the new appliance will also use dynamic addressing. When the import is complete, the new vCenter Server Appliance starts.
  14. Review the list of hosts managed by the source appliance and make sure that the hosts you want the new appliance to manage are checked.
  15. Review the pre-upgrade check of the source appliance hosts and correct any errors before proceeding.
  16. Confirm that you have taken a backup or snapshot of the source appliance and the external database and click Next.
  17. (Optional) To follow the upgrade process, open an SSH session to the vCenter Server Appliance and run this command:

    tail -f /var/log/vmware/vami/upgrade.log

    Note: This also helps in identifying where the process has stopped, if there are any issues with the upgrade.
  18. When the upgrade is complete, click Close.

    The vCenter Server Appliance is upgraded and the new appliance reboots. 
    Source:-

Difference between Physical compatibility RDMs and Virtual compatibility RDMs (2009226)

Purpose

This article provides information on the RDM compatibility modes and helps you to choose the mode that best suits your environment requirements.

Resolution

An RDM is a special mapping file in a VMFS volume that manages metadata for its mapped device. The mapping file is presented to the management software as an ordinary disk file, available for the usual file-system operations. To the virtual machine, the storage virtualization layer presents the mapped device as a virtual SCSI device.

RDM has two compatibility modes:
  • Physical compatibility mode
  • Virtual compatibility mode

Physical compatibility mode

  • Physical mode specifies minimal SCSI virtualization of the mapped device, allowing the greatest flexibility for SAN management software.
  • VMkernel passes all SCSI commands to the device, with one exception - The REPORT LUNs command is virtualized, so that the VMkernel can isolate the LUN to the owning virtual machine. Otherwise, all physical characteristics of the underlying hardware are exposed.
  • Physical mode is useful while running SAN management agents or other SCSI target-based software in the virtual machine.
  • Physical mode also allows virtual-to-physical clustering for cost-effective high availability.
  • Virtual Machine Snapshots are not available when the RDM is used in physical compatibility mode.
  • You can use this mode for Physical-to-virtual clustering and cluster-across-boxes.

Virtual compatibility mode

  • Virtual mode specifies full virtualization of the mapped device.
  • VMkernel sends only READ and WRITE to the mapped device. The mapped device appears to the guest operating system exactly the same as a virtual disk file in a VMFS volume.
  • The real hardware characteristics are hidden.
  • If you are using a raw disk in virtual mode, you can realize the benefits of VMFS, such as advanced file locking for data protection and snapshots for streamlining development processes.
  • Virtual mode is more portable across storage hardware than physical mode, presenting the same behavior as a virtual disk file.
  • You can use this mode for both Cluster-in-a-box and cluster-across-boxes.
Note: RDM is not available for direct-attached block devices or certain RAID devices. You cannot map a disk partition as RDM. RDMs require the mapped device to be a whole LUN.

Source:-
http://kb.vmware.com/selfservice/microsites/search.do?language=en_US&cmd=displayKC&externalId=2009226

Friday, 31 May 2013

DRS VM to VM Anti-Affinity Rule Step by Step

1. Right Click on Datacenter ---> Click on New Cluster. Specify the Cluster Name and Turn on vSphere DRS.

2. Select the Required DRS Automation Level (For Example: Manual)


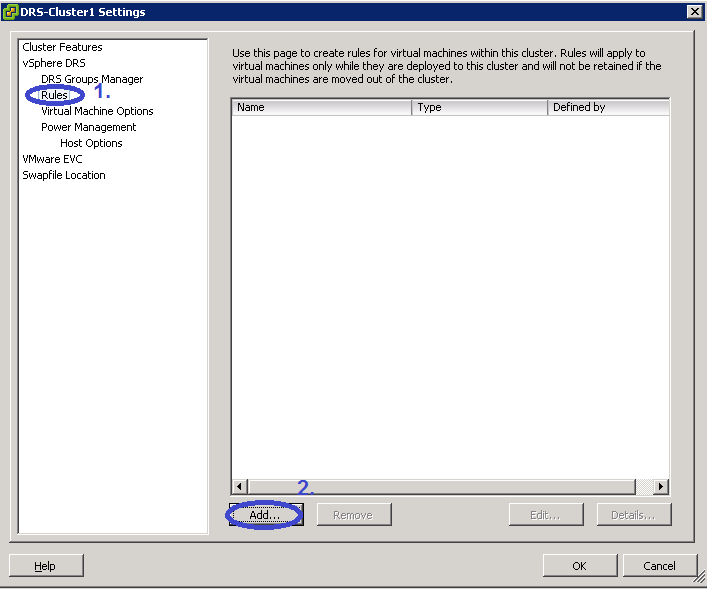
3.  Select Rules ---> Click on Add

4.  Specify the Rule Name ---> Select the Rule Type ---> Click on Add Button ----> Select the VM's ---> Click on OK ---> Click on OK again.

5. Select the Cluster ---> Open the DRS Tab ---> Click on Apply Recommendations.

Tuesday, 28 May 2013

Cannot click vSphere Client Security Warning dialog buttons

Symptoms

  • When logging in with the vSphere Client you see a Security Warning dialog with a message similar to:
    An untrusted SSL certificate is installed on "<hostname>" and secure communication cannot be guaranteed. Depending on your security policy, this issue might not represent a security concern. You may need to install a trusted SSL certificate on your server to prevent this warning from appearing.
  • You cannot click any of the dialog buttons or move the dialog window.

Resolution

This issue occurs if:
  • You have a Message of the Day configured for your vCenter Server.

    And
  • You have Update Manager installed and have not acknowledged the Security Warning for it.

    And
  • You have not acknowledged the Security Warning for your vCenter Server.
This issue occurs because the Update Manager Security Warning is underneath the Security Warning displayed from vCenter Server. Although you cannot view the dialog, it must be canceled before you can proceed.

To cancel the dialog underneath the first Security Warning, press Alt+F4. This cancels the first dialog window (that is not visible) and allows you to acknowledge the Security Warning.

To resolve this issue temporarily, remove the Message of the Day, then add it back after you acknowledge the Security Warnings.

Even you can press the "ESC" Key 

Source:-

Monday, 20 May 2013

Configure a Client Device Type for the DVD/CD-ROM Drive


Select the mode used for the connection.
■
Passthrough IDE (raw). Use mode only for remote client device access.
■
Emulate IDE. Use to access a host CD-ROM device.
The host CD-ROM device is accessed through emulation mode. Passthrough mode is not functional for local host CD-ROM access. You can write or burn a remote CD only through pass-through mode access, but in emulation mode you can only read a CD-ROM from a host CD-ROM device.

Wednesday, 15 May 2013

Multiple-NIC vMotion in vSphere 5 (2007467)


Details

The release of vSphere 5.0 provided a number of new enhancements to vMotion. This article discusses the procedure for performing a vMotion across multiple NICs.
This article comes from a blog post by VMware Principal Architect Duncan Epping, http://www.yellow-bricks.com/2011/09/17/multiple-nic-vmotion-in-vsphere-5/.
Note: The preceding link was correct as of February 4, 2012. If you find the link is broken, provide feedback and a VMware employee will update the link.

Solution

Setting up multi-NIC vMotion in vSphere 5.x on a standard vSwitch


To set up Multi-NIC vMotion in vSphere 5.x on a Standard vSwitch:
  1. Log into the vSphere Client and select the host from the inventory panel.
  2. Click the Configuration tab and select Networking.
  3. Click Add Networking and choose VMkernel as the Connection Type.
  4. Click Next.
  5. Add two or more NICs to the required standard switch.

    Note: You can create a new vSphere standard switch or use an existing vSwitch.
  6. Name the VMkernel portgroup (for example, vMotion-01), and assign a VLAN ID as required.
  7. Click Use this port group for vMotion, then click Next.
  8. Configure the IP address and subnet mask, then click Next..
  9. Click the Properties tab of the vSwitch, select the vMotion-01 portgroup, and click Edit.
  10. Click the NIC Teaming tab.
  11. Under Failover Order, select Override switch failover order.
  12. Configure the first adapter (for example, vmnic1) as active and move the second adapter (for example, vmnic3) tostandby.
  13. Click OK.
  14. Under the vSwitch Properties, click Add to create a second VMkernel portgroup.
  15. Name the VMkernel portgroup (for example, vMotion-02), and assign a VLAN ID as required.

    Note: Ensure that both VMkernel interfaces participating in the vMotion have the IP address from the same IP subnet.
  16. Click Use this port group for vMotion, then click Next.
  17. Configure the IP address and subnet mask, then click Next.
  18. Click the Properties tab of the vSwitch, select the vMotion-02 portgroup, and click Edit.
  19. Click the NIC Teaming tab.
  20. Under Failover Order, select Override switch failover order.
  21. Configure the second adapter (for example, vmnic3) as active and move the first adapter (for example, vmnic1) tostandby.
  22. On the Properties tab of the vSwitch, select each vMotion portgroup in turn and confirm that the active and standby adapters are the reverse of each other.

Setting up multi-NIC vMotion in vSphere 5.x on a distributed vSwitch


To set up Multi-NIC vMotion in vSphere 5.x on a Distributed vSwitch:

  1. Log into the vSphere Client and click the Networking inventory.
  2. Click New vSphere Distributed Switch and choose version 5.0.0.
  3. Name the Distributed switch (for example, Multi-NIC-vMotion).
  4. Assign two uplink ports to the switch, then click Next.
  5. Select physical adapters to each of the hosts, then click Next and Finish.
  6. Expand the Distributed switch you just created, click the dvPortGroup and click Edit Settings.
  7. Name the dvPortgroup (for example, vMotion-01).
  8. Click VLAN and assign a VLAN ID as required.
  9. Click the Teaming and Failover tab, configure dvUplink1 as Active Uplink and move dvUplink2 to Standby Uplink.
  10. Right-click the Distributed vswitch, then click New Port Group.
  11. Name the dvPortgroup (for example, vMotion-02).
  12. Click VLAN and assign a VLAN ID as required, then click Next and Finish.
  13. Select the second portgroup created, then click the Teaming and Failover tab.
  14. Configure dvUplink2 as Active Uplink and move dvUplink1 to Standby Uplink.
  15. Go the Hosts and Clusters Inventory tab, select a host's Networking, and click vSphere Distributed Switch.
  16. Click Manage Virtual Adapters and click Add to add new virtual adapter.
  17. Choose VMkernel as the Virtual Adapter Type.
  18. Select the vMotion-01 portgroup, click Use this port group for vMotion, then click Next.
  19. Configure the IP address and subnet mask, then click Next and Finish.
  20. Add another virtual adapter, then select the vMotion-02 portgroup.
  21. On the Distributed vSwitch, select each dvportgroup on VMKernel Port vmk1 and vmk2 in turn, and confirm that the active and standby uplinks are the reverse of each other.

    Note: Ensure that both VMkernel interfaces participating in the vMotion have the IP address from the same IP subnet.

After making these configuration changes, when you initiate a vMotion, multiple NIC ports are used. Even when performing a vMotion on just one virtual machine, both links are used.

If you do not have dedicated links for vMotion, consider using Network I/O Control. vMotion can saturate a link. When you have set up Network I/O Control, and assigned the correct amount of shares, each type of traffic gets what it has been assigned.

Note: vMotion and IP-based storage traffic should not be routed, as this may cause latency issues. Any internal/private subnet can work as long as it is unique and dedicated exclusively to that specific type of traffic. Routed IP storage is not supported. Follow the recommendations for IP-based storage configuration published by VMware.
Source:-

Limits on Simultaneous Migrations


Each operation, such as a migration with vMotion or cloning a virtual machine, is assigned a resource cost. Each type of resource, such as host, datastore, or network, has a maximum cost that it can support at any one time. Any new migration or provisioning operation that would cause a resource to exceed its maximum cost does not proceed immediately, but is queued until other operations complete and release resources. Each of the network, datastore, and host limits must be satisfied for the operation to proceed.
Network limits apply to migrations with vMotion only. Network limits depend on both the version of ESXi and the network type.
Network Limits for Migration with vMotion lists network limits for migration with vMotion.
Network Limits for Migration with vMotion
Operation
ESX/ESXi Version
Network Type
Maximum Cost
vMotion
3.x
1GigE and 10GigE
2
vMotion
4.0
1GigE and 10GigE
2
vMotion
4.1, 5.0
1GigE
4
vMotion
4.1, 5.0, 5.1
10GigE
8
All migrations with vMotion have a network resource cost of 1.
Datastore limits apply to migrations with vMotion and with Storage vMotion. A migration with vMotion involves one access to the datastore. A migration with storage vMotion involves one access to the source datastore and one access to the destination datastore.
Datastore Limits for Migration with vMotion and Storage vMotion lists datastore limits for migration with vMotion and Storage vMotion. Datastore Resource Costs for vMotion and Storage vMotion lists the datastore resource costs for migration with vMotion and Storage vMotion.
Datastore Limits for Migration with vMotion and Storage vMotion
Operation
ESX/ESXi Version
Maximum Cost
vMotion/Storage vMotion
3.x
8
vMotion/Storage vMotion
4.0
8
vMotion/Storage vMotion
4.1, 5.0, 5.1
128
Datastore Resource Costs for vMotion and Storage vMotion
Operation
ESX/ESXi Version
Datastore Resource Cost
vMotion
3.x
1
vMotion
4.0
1
vMotion
4.1
1
Storage vMotion
3.x
1
Storage vMotion
4.0
1
Storage vMotion
4.1, 5.0, 5.1
16
Host limits apply to migrations with vMotion, Storage vMotion, and other provisioning operations such as cloning, deployment, and cold migration.
Host Limits for vMotion, Storage vMotion, and Provisioning Operations lists the host limits for migrations with vMotion, migrations with Storage vMotion, and provisioning operations. Host Resource Costs for vMotion, Storage vMotion, and Provisioning Operations lists the host resource cost for these operations.
Host Limits for vMotion, Storage vMotion, and Provisioning Operations
Operation
ESX/ESXi Version
Maximum Cost
vMotion
3.x, 4.0, 4.1, 5.0, 5.1
2, 2, 8, 8, 8, respectively
Storage vMotion
3.x, 4.0, 4.1, 5.0, 5.1
2
other provisioning operations
3.x, 4.0, 4.1, 5.0, 5.1
8
Source: