Translate

Total Pageviews

My YouTube Channel

Thursday 28 February 2019

NSX-T Create Logical Switches - Part 8

Logical switch reproduces switching functionality, broadcast, unknown unicast, multicast (BUM) traffic, in a virtual environment completely decoupled from underlying hardware.

If you missed previous parts in this blogpost series. Here is the Links:-
Part - 1
Part - 2
Part - 3
Part - 4
Part - 5
Part - 6
Part - 7

 Logical switches are similar to VLANs or portgroup (if you are from vSphere Background), in that they provide network connections to which you can attach virtual machines. The VMs can then communicate with each other over tunnels between hypervisors if the VMs are connected to the same logical switch. Each logical switch has a virtual network identifier (VNI), like a VLAN ID. Unlike VLAN, VNIs scale well beyond the limits of VLAN IDs.

To see and edit the VNI pool of values, log in to NSX Manager, navigate to Fabric > Profiles, and click the Configuration tab. Note that if you make the pool too small, creating a logical switch will fail if all the VNI values are in use. If you delete a logical switch, the VNI value will be re-used, but only after 6 hours.

Prerequisites
  • Verify that a transport zone is configured.
  • Verify that fabric nodes are successfully connected to NSX management plane agent and NSX local control plane.
  • Verify that transport nodes are added to the transport zone.
  • Verify that the hypervisors are added to the NSX fabric and VMs are hosted on these hypervisors.
  • Verify that your NSX Controller cluster is stable.

How to Create Logical Switch 

1. Switching > Switches > Add 


 2.  Configure the required details from General Tab for Web Logical Switch
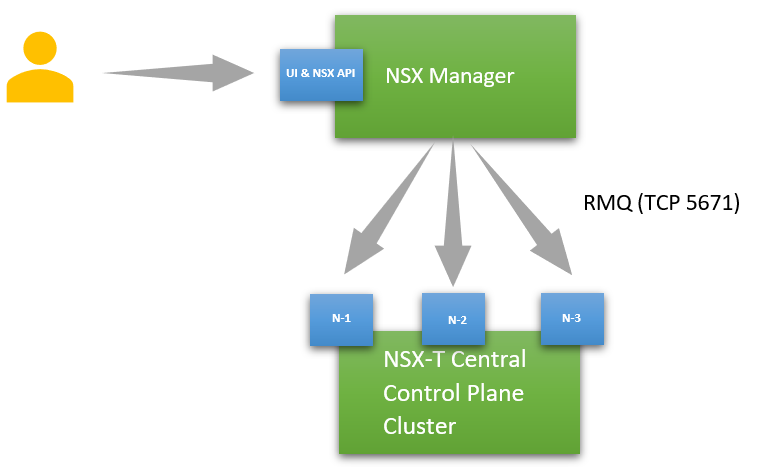
Replication Mode :- As with any Layer 2 network, sometimes traffic that is originated by a VM needs to be flooded, meaning that it needs to be sent to all of the other VMs belonging to the same logical switch. This is the case with Layer 2 broadcast, unknown unicast, and multicast traffic (BUM traffic). Recall that a single NSX-T Data Center logical switch can span multiple hypervisors. BUM traffic originated by a VM on a given hypervisor needs to be replicated to remote hypervisors that host other VMs that are connected to the same logical switch. To enable this flooding, NSX-T Data Center supports two different replication mode.

Hierarchical Two-Tier Replication
In this as per our Example, TN-1 check TEP Table of VNI 78907 to determine the TEP IPs of other hosts connected with the same VNI 78907. Then it creates the Copy of every BUM frame and sends the copy directly to each host in same subnet and TN-1 nominates one host as replicator in remote subnet TEPs. Replicator Nodes receives the copy of each BUM frame for VNI 78907 and in encapsulation header copy is flagged as replicate locally. Now its the responsibility of replicator to create a copy of BUM frame for each host in same TEP subnet.

In this diagram Router is Physical Router for connecting TEPs


 Head Replication
This is also known as Headend Replication , there will be no replicator. TN-1 creates the copy of each BUM frame for each TEP, TEP can be either belong to local subnet or remote subnet.

In this diagram Router is Physical Router for connecting TEPs


 Note:- If all the Transport Nodes (TNs) are from the same subnet that choice of replication mode is not going to make any difference


3.  Configure the Switching Profies as Needed


4.  Likewise provide the details for App Logical Switch


5. Likewise provide the details for DB Logical Switch


As soon as logical switches are created, login to vSphere Environment by using vSphere Client or vSphere Web Client > open Networking inventory view and these logical switches will be listed as opaque network in vSphere. Now you can connect your VM with this logical switch like how you can connect your VM with traditional portgroup.

Opaque Network
An opaque network is a network created and managed by a separate entity outside of vSphere. For example, logical networks that are created and managed by VMware NSX® appear in vCenter Server as opaque networks of the type nsx.LogicalSwitch. You can choose an opaque network as the backing for a VM network adapter. To manage an opaque network, use the management tools associated with the opaque network, such as VMware NSX® Manager™ or the VMware NSX® API™ management tools.

NSX-T Promote Hypervisor Nodes as Transport Nodes - Part 7

A transport node is a node that participates in an NSX-T Data Center overlay or NSX-T Data Center VLAN networking.

If you missed previous parts in this blogpost series. Here is the Links:-
Part - 1
Part - 2
Part - 3
Part - 4
Part - 5
Part - 6

How to Promote ESXi Hosts as Transport Node (Fabric Node)
Prerequisites
  • The host must be joined with the management plane, and MPA connectivity must be Up on the Fabric > Hosts page.
  • A transport zone must be configured.
  • An uplink profile must be configured, or you can use the default uplink profile.
  • An IP pool must be configured, or DHCP must be available in the network deployment.
  • At least one unused physical NIC must be available on the host node. 

1. Fabric > Nodes > Hosts > Select vCenter Server > Configure Cluster > Select the Cluster which you want to prepare.


2. Configure the required details


3. Verify Manager Connectivity, Controller Connectivity and Deployment Status.

4. As i have enabled auto creation of Transport Node in Step No. 2, Result is these ESXi Server Would be listed as Transport Node under the Transport Nodes tab.


How to Promote KVM Hosts as Transport Node (Fabric Node)

1. First Prepare KVM Nodes with MPA (Management Plane Agent)
Fabric > Nodes > Hosts > Standalone Hosts > Add > Provide the details of KVM Node


2. Click on Add on Thumbprint Page.


3. Likewise add the Second KVM Node too


4. Now Promote these KVM Nodes as Transport Nodes
 Fabric > Nodes > Transport Nodes > Add

As a result of adding an ESXi host to the NSX-T fabric, the following VIBs get installed on the host.
  • nsx-aggservice—Provides host-side libraries for NSX-T aggregation service. NSX-T aggregation service is a service that runs in the management-plane nodes and fetches runtime state from NSX-T components.
  • nsx-da—Collects discovery agent (DA) data about the hypervisor OS version, virtual machines, and network interfaces. Provides the data to the management plane, to be used in troubleshooting tools.
  • nsx-esx-datapath—Provides NSX-T data plane packet processing functionality.
  • nsx-exporter—Provides host agents that report runtime state to the aggregation service running in the management plane.
  • nsx-host— Provides metadata for the VIB bundle that is installed on the host.
  • nsx-lldp—Provides support for the Link Layer Discovery Protocol (LLDP), which is a link layer protocol used by network devices for advertising their identity, capabilities, and neighbors on a LAN.
  • nsx-mpa—Provides communication between NSX Manager and hypervisor hosts.
  • nsx-netcpa—Provides communication between the central control plane and hypervisors. Receives logical networking state from the central control plane and programs this state in the data plane.
  • nsx-python-protobuf—Provides Python bindings for protocol buffers.
  • nsx-sfhc—Service fabric host component (SFHC). Provides a host agent for managing the lifecycle of the hypervisor as a fabric host in the management plane's inventory. This provides a channel for operations such as NSX-T upgrade and uninstall and monitoring of NSX-T modules on hypervisors.
  • nsxa—Performs host-level configurations, such as N-VDS creation and uplink configuration.
  • nsxcli—Provides the NSX-T CLI on hypervisor hosts.
  • nsx-support-bundle-client - Provides the ability to collect support bundles.
To verify, you can run the esxcli software vib list | grep nsx or esxcli software vib list | grep <yyyy-mm-dd> command on the ESXi host, where the date is the day that you performed the installation.


5. Select the Overlay Transport Zone in general tab

6. Provide the N-VDS details and other details > Add

7. Likewise Promote the Second KVM Node too.


use dpkg -l | grep nsx command to verify NSX Kernel Module in KVM Host


Wednesday 27 February 2019

NSX-T IP Pools - Part 6

IP pools are for the tunnel endpoints (TEPs). Tunnel endpoints are the source and destination IP addresses used in the external IP header to uniquely identify the hypervisor hosts (ESXi or KVM) originating and terminating the NSX-T Data Center encapsulation of overlay frames. You can also use either DHCP or manually configured IP pools for tunnel endpoint IP addresses.

If you missed previous parts in this blogpost series. Here is the Links:-
Part - 1
Part - 2
Part - 3
Part - 4
Part - 5

How to Create IP Pool
1. Login to NSX Manager UI
Start Web Browser > https://NSXManagerFQDNorIP > Username = admin, Password = As Configured

2. Inventory > Groups > IP Pools > Add


3. Configure Name, Description and Add Subnets > Add

Note:- 
  • If you have clients more than /24 and need more IPs or overflowing IPs from one subnet.
  • If you have multiple Racks, multiple ToRs then create multiple TEP pools.


Monday 25 February 2019

NSX-T Transport Zone - Part 5

Transport Zone is logical boundry to control the visibility of logical switches to hosts, who can see which logical switch can be controlled with Transport Zone. Which helps to control the communication. If you missed the previous parts in this blog series, Here is the links:-

Part - 1
Part - 2
Part - 3
Part - 4

How to Create Transport Zone
1. Login to NSX Manager UI
Start Web Browser > https://NSXManagerFQDNorIP > Username = admin, Password = As Configured


2. Fabric > Transport Zones > Add


3. If you want to create Overlay Transport Zone Select Overlay Option and N-VDS Name is Needed here for the Transport Zone Creation, this N-VDS will be created as Host Switch (ESXi) or Open vSwitch (KVM) depends on the type of hypervisor you are using as soon as those are attached with Transport Zone.
Optionally Uplink Teaming Policy can be specificed.

N-VDS Mode Types:-
Standard
Enhanced Datapath


4. If you want to create VLAN Transport Zone.


NSX-T Central Control Plane Cluster Deployment - Part 4

Now in this blogpost series we are now going to discuss about the NSX-T Controller Deployment. If you missed the previous posts in this series. Here is the Links:-

Part - 1
Part - 2
Part - 3

NSX-T Controller Deployment Requirements
As in my previous post i have discussed that NSX-T Controller is available in VM Form Factor.

Information Source : VMware Docs

https://docs.vmware.com/en/VMware-NSX-T/2.2/com.vmware.nsxt.install.doc/GUID-447C0417-A37B-4C2E-965E-499F52587160.html

NSX-T Controller Automated Deployment - UI Based
In this post i will discuss about automated deployment of NSX-T Controller in vSphere Environment, which requires vCenter. Although NSX-T has no must requirement to use vCenter Server, if you do not have vCenter or vSphere Environment then you have to perform Manual Deployment.

A.  Add Compute Manager
1.. Login to NSX Manager UI
Open Web Browser > Type https://NSXManagerFqdnORip > Username = admin, Password = As Specified > Click Login

2. Fabric > Compute Managers > Add


3. Enter vCenter Details > Click on Add


4. If you have not entered the thumbprint in previous step, it will pop-up this message > Click on Add


5. Verify the Status Finally.

B. Add NSX Controllers
 System > Components > Add Controllers


Provide the required details


provide the details for first controller Node

Click on Add Controller and provide the details for second controller Node


Click on Add Controller again and provide the details for third controller Node. NSX Central Control Plane Cluster can have maximum three Nodes:-


Once all the Nodes gets deployed then NSX Manager UI will also be updated. Now Login to One of the controller node and check the status of cluster and even you can verify the status of the currently connected Node, Is it Master or not

get control-cluster status


NSX-T Controller Deployment on ESXi - Manual Method
https://docs.vmware.com/en/VMware-NSX-T/2.2/com.vmware.nsxt.install.doc/GUID-24428FD4-EC8F-4063-9CF9-D8136740963A.html

NSX-T Controller Deployment on KVM - Manual Method
https://docs.vmware.com/en/VMware-NSX-T/2.2/com.vmware.nsxt.install.doc/GUID-63BC6E07-F926-4BAC-9A22-E2C0B1E87435.html


Sunday 24 February 2019

NSX-T Manager Deployment - Part 3

In my previous posts i have discussed about what is NSX-T and It's Planes. If you haven't seen these posts, here is the link:-

Part -1 
Part -2 

As discussed in previous post NSX Manager is available in the VM form Factor. Let's talk about the deployment of NSX Manager. NSX Manager is deployed as an virtual appliance.

Requirements:-
Information Taken From VMware Docs
 https://docs.vmware.com/en/VMware-NSX-T-Data-Center/2.3/com.vmware.nsxt.install.doc/GUID-A65FE3DD-C4F1-47EC-B952-DEDF1A3DD0CF.html

How to Deploy NSX Manager Appliance
https://docs.vmware.com/en/VMware-NSX-T-Data-Center/2.3/com.vmware.nsxt.install.doc/GUID-FA0ABBBD-34D8-4DA9-882D-085E7E0D269E.html

NSX-T Planes Introduction - Part 2

NSX-T Management Plane 
NSX Manager
NSX Manager is a virtual appliance that provides the graphical user interface (GUI) and the REST APIs for creating, configuring, and monitoring NSX-T Data Center components, such as logical switches, and NSX Edge services gateways.

NSX-T Control Plane 
Computes all ephemeral runtime state based on configuration from the management plane, disseminates topology information reported by the data plane elements, and pushes stateless configuration to forwarding engines.


NSX-T Central Control Plane Cluster
NSX Controller is deployed as a cluster of highly available virtual appliances that are responsible for the programmatic deployment of virtual networks across the entire NSX-T Data Center architecture. The NSX-T Data Center CCP is logically separated from all data plane traffic, meaning any failure in the control plane does not affect existing data plane operations. Traffic doesn’t pass through the controller; instead the controller is responsible for providing configuration to other NSX Controller components such as the logical switches, logical routers, and edge configuration. Stability and reliability of data transport are central concerns in networking. To further enhance high availability and scalability, the NSX Controller is deployed in a cluster of three instances.
It populates rules and tables on data plane nodes.


NSX-T Data Plane

Hypervisor Transport Nodes
  • It is forwarding plane for VM's Traffic
  • It Supports ESXi and KVM Hypervisors
  • It is implemented as new vSwitch in ESXi and Open vSwitch in KVM
NSX Edge Transport Node
  • NSX Edge provides routing services and connectivity to networks that are external to the NSX-T Data Center deployment.
  • NSX Edge can be deployed as a bare metal node or as a VM.
  • NSX Edge is required for establishing external connectivity from the NSX-T Data Center domain, through a Tier-0 router via BGP or static routing. Additionally, an NSX Edge must be deployed if you require network address translation (NAT) services at either the Tier-0 or Tier-1 logical routers.
  • The NSX Edge gateway connects isolated, stub networks to shared (uplink) networks by providing common gateway services such as NAT, and dynamic routing. Common deployments of NSX Edge include in the DMZ and multi-tenant Cloud environments where the NSX Edge creates virtual boundaries for each tenant. 


Refer
NSX-T Introduction - Part 1

NSX-T Introduction - Part 1

NSX-T Full Form
Network and Security X - Transformers

What is NSX-T?
NSX-T is basically Network Virtualization Solution which supports Multi-Hypervisor and Multi-Cloud Platform. It is Network Hypervisor for (Layer 2 - Layer 7) Services of OSI Model.

NSX-T Planes
NSX-T works by implementing three integrated Planes known as Management Plane, Control Plane and Data Plane.


NSX-T Endpoints
NSX-T offers the Networking Platforms for multiple types of endpoints.