
My YouTube Channel

Friday, 27 June 2014


Monday, 23 June 2014
Services Supported by vSphere App HA
vSphere App HA ensures all the supported services that are running in your environment, for which policies have been defined, have high availability at all times.
To verify the latest versions that are supported, use the VMware Interoperability Matrix at http://partnerweb.vmware.com/comp_guide2/sim/interop_matrix.php.
To work with SharePoint, you must have the vFabric Hyperic 5.7.1 SharePoint plug-in. You can download the plug-in from the VMware Solutions Exchange sitehttps://solutionexchange.vmware.com/store/products/microsoft-sharepoint-plugin-hyperic.
Info taken from Vmware Documentation
Site Recovery Manager with vSphere Replication Multi-Point-in-Time
One of the new 5.5 features in vSphere Replication is the ability to retain historical replications as point-in-time snapshots on the recovered virtual machines.
Using this feature is quite handy in order to recover from systems that have corrupted data or viruses or even to do auditing of system changes and the like. While VMs protected with vSphere Replication can be recovered manually, and one by one, the full automation of recovery is of course offered by Site Recovery Manager.
In this post I’ll look at how we configure these multiple points in time (MPIT) during replication, and how we interact with them after failover by SRM.
Since MPIT configuration has already been covered previously, we will start with the assumption that VMs have been configured for replication already, and that MPIT is being used for some set of historical point in time retention. In this scenario I have 5 replicas being retained per day.
Our virtual machine (“TestSRV36”) is a pretty standard Windows VM, with 1 disk, provisioned for 20 GB on disk, using about 11 actual GB of space. The average replication delta is about 400 KB… it’s not doing much in my lab!
 Now I’m going to browse the datastore on the target location, in the recovery site – this is where the MPIT snapshots are held. We can see a whole bunch of files are in the directory:
- TestSRV36.vmdk – this is the root disk file that will be used for recovery.
- hbrcfg…vmx.yyyy – these are the VMX config files associated with each point in time. If we need to revert we want to have the VMX associated with that timestamp available as well of course, so that file is retained historically.
- hbrcfg…nvram.yyyy – these are the BIOS contents associated with the VM at that particular point in time.
- hbrcfg…vmxf.yyyy – supplemental config data for the VMX again timestamped to that particular PIT.
- hbrdisk.RDID… – the actual snapshot for that point in time. Now technically this is not a proper snapshot, yet. When VR populates a replica on the recovery site it will create in essence a redo log. That’s what this file is, the redo log for that replication. Once each redo log has a complete set of data for a given replication this file gets committed just like a snapshot to the primary VMDK. With MPIT configured, the redo logs are retained (and cleaned up) in accordance with the policy for retention. This file is what will get turned into a ‘proper’ snapshot when recovery is initiated.
So you can see that for each configured point in time for the historical replications, we have a correlate set of files on disk for that point-in-time. There is the ‘root disk’ failover target (the VMDK) and all the vmx, nvram, vmxc, and hbrdisk snapshots for the historical points.
Now that the VMs are replicated and we are generating historical snapshots, we simply add them to protection groups and recovery plans in SRM like any VR protected VM.
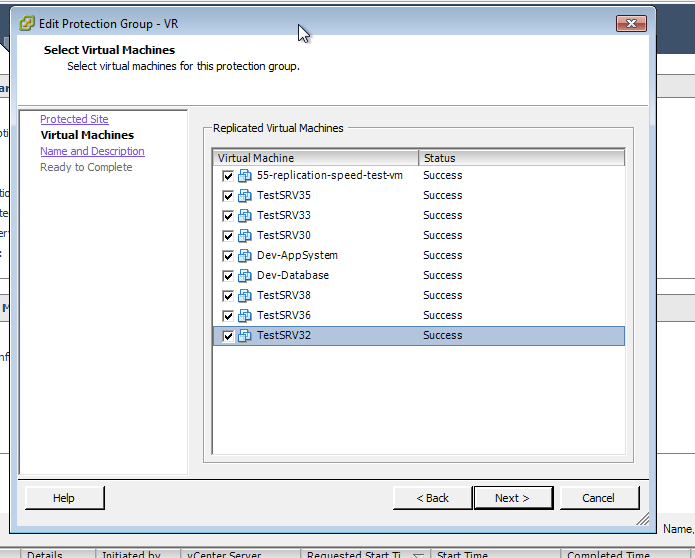 When recovering VMs with SRM however, there may be reasons for *not* wanting to retain every historical snapshot. It’s fine to do individual VM failovers and then manually select a revert point via snapshot, but there may also be very good reasons not to have all the snapshots as part of a mass DR failover.
For example, if you are customizing IP addresses, or running scripts or the like, reverting a VM to a previous state might be a “Very Bad Thing”. All the customization and scripting changes would be lost, as those items are only applied to the failover snapshot, not to the previous points in time. Likewise, it may be a DR administrator who fails over, a VMware administrator who runs the VMs, and an application owner that would need to make the decision. If a wayward VMware Administrator sees a bunch of snapshots, or if a script runs that consolidates snapshots, it may add burden or indeed completely mess things up to have all those snapshots sitting there. Not to mention the overhead and commit time of consolidating all the snapshots on recovery.
 For this reason in SRM we give the ability to override the MPIT setting and choose *not* to retain the MPIT history. By default the setting “vrReplication.preserveMpitImagesAsSnapshots” is selected. If you choose not to retain the history, you can simply go into the SRM interface, click on a site (or both sites), select the “Advanced Settings”, navigate to “vrReplication” and *deselect* the option. This will then have the effect of consolidating all the snapshots as part of the failover automatically. There is no best practice here, it is simply an option if you like the option of using MPIT on a daily basis but might choose not to use it for full DR purposes.
Now say we need to fail over for some reason to our recovery site, in SRM we run the recovery plan to migrate, and watch as everything recovers. VR will do a final synchronization if it can after the VMs are powered off, and then as part of the recovery it will ‘promote’ the most recent VMX, turn the placeholder into a ‘real’ VM, attach the VMDK to the placeholder by a ReloadVMFromPath API command, and power it on.
 If we browse the datastore now, we see some differences: The VMX file is now a normal VMX file, the vswp file is created and the VM is up and running; the redo logs are now turned into full snapshots with not just the correlate VMDKs of the snapshots but also the memory state contents of the VMSN files.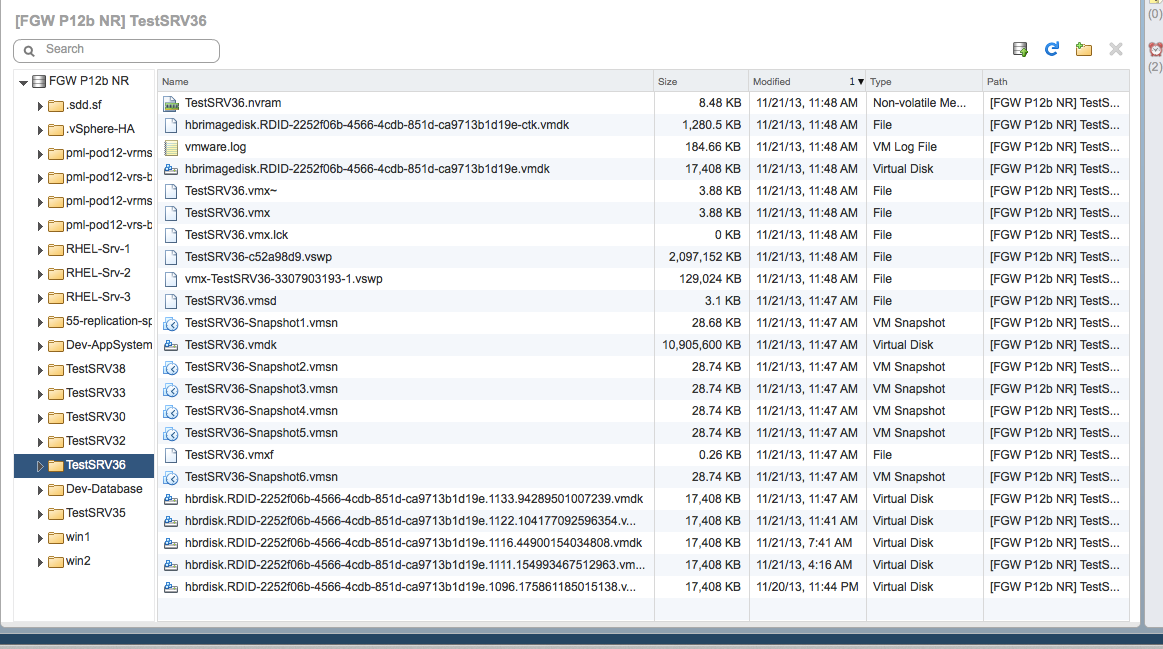
Indeed if we now manage the snapshots of the recovered VMs we can see the standard snapshot manager tree view. The snapshots are just like any other VMware snapshot, accessed through the same and familiar snapshot interface that administrators are accustomed to. Snapshots can be reverted to, deleted, or consolidated just like any other snapshot on any other VM – these ones were merely created by replication rather than by manual interaction.

 Best practices?
- Don’t do this for every VM, only the ones where you think you might need it. Why? Lots of reasons ranging from extra disk space utilization, possible problems on rollback if using customization, extra time taken to commit snapshots after recovery, and so forth.
- If you do use snapshots and failover with SRM, commit them as soon as possible. It’s never been a good idea to leave long chains of snapshots hanging off VMs for a long period of time, and these are no different.
- Speaking of long chains, you can have up to 24 historical points retained with X number per day up to Y days in any combination as long as the total number is 24 or less. Should you therefore do 24? Not unless you need it! Again, committing snapshots is not a trivial thing, particularly if they are large snapshots. Use discretion in your MPIT policy.
- There is no automated way to preselect a point in time for failover. It will always fail over to the most recent point in time and then you will need to manually select a snapshot to revert to if chosen. Make your life simpler and use less frequent MPIT where possible to avoid a long process of moving around through snapshots!
Lastly, keep in mind these snapshots are only created on the recovery side. They add no overhead to the VM, there is no snapshot created on the protected VM, there is no additional interaction with the production VM, it is a completely nonintrusive process to create these. All the work is done on the replica object, not the protected VM.
Hopefully this helps you understand the use of VR’s new MPIT feature with Site Recovery Manager!
Thanks to Ken Werneburg for Nice Post
Source:-
vSphere Data Protection Direct-to-Host Emergency Restore
One of the most popular feature requests for vSphere Data Protection (VDP) 5.1 and vSphere Data Protection Advanced (VDP Advanced) 5.1 was the ability to restore a virtual machine (VM) directly to a vSphere host when vCenter Server and/or vSphere Web Client were offline. VDP 5.5 was announced at VMworld in San Francisco and, as you may already know, this feature was introduced. It is called Emergency Restore. VDP Advanced 5.5 was recently announced at VMworld in Barcelona. VDP Advanced 5.5 is not available for download yet, but as you would expect, Emergency Restore will be a feature of VDP Advanced 5.5. This article takes a closer look at Emergency Restore and discusses a few use cases.
Emergency Restore is accessed by logging into the VDP Configure user interface (UI) with a supported web browser.

The Emergency Restore tab shows the virtual machines (VMs) available for restore. Clicking the small arrow next to a VM expands the list of available restore points (date and time) for that VM. To initiate a restore, select a restore point and click the Restore button. The progress of the restore job can be monitored on the Emergency Restore tab.

It is important to understand the requirements and limitations around using Emergency Restore:
- DNS must be available and configured properly for the VDP appliance and the vSphere host on which the VDP appliance is running.
- Emergency Restore can only restore a VM to the vSphere host on which the VDP appliance is running.
- A restored VM is placed in the root of the vSphere host inventory.
- VM is restored as a new VM – ensure that the name provided for the VM is not already in use on the vSphere host to avoid overwriting an existing VM.
- Restored VM will be in a powered off state – the VM can be manually powered on after the restore is complete.
- The vSphere host running the VDP appliance must be disassociated from vCenter Server for Emergency Restore to work. This can be accomplished by using the vSphere Client (not vSphere Web Client) connected directly to the vSphere host. “Disassociate host from vCenter Server…” is located in Host Management on the Summary tab (when the host is selected in the left window panel of the vSphere Client). This must be done prior to performing the Emergency Restore.

It is no secret that VDP and VDP Advanced utilize EMC Avamar technology. A significant amount of development work on VDP and VDP Advanced is done by EMC engineers. A couple of the QA engineers at EMC have written an excellent document that covers Emergency Restore in greater detail. This paper also discusses best practices for properly protecting and restoring vCenter Server and a Microsoft Windows Server 2012 AD domain controller with VDP 5.5 and VDP Advanced 5.5. Some of the information in this article was taken from this document which can be viewed here:
Thank you to Mohammed Samad and Vemuri Krishna for creating and making this document available!
Thanks to Jeff Hunter for such a well explained article
Source:-
Sunday, 22 June 2014
Reliable Memory in vSphere 5.5

This is a patented new technology from Dell, wherein the hypervisor and system hardware can work together to place the hypervisor in a more redundant section of memory. Dell servers have shipped with a variety of tricks to protect against memory faults, things like Memory Page Retire, which will dynamically remove a page from usable memory space if it encounters an error. However, to get better reliability than that one had to enable the memory mirroring options in the BIOS.
Of course, memory mirroring is just like RAID 1 on disk: you get half the usable space. And on these E5-2600s there aren’t a ton of DIMM sockets to start with (and right now 32 GB DIMMs are 4x the price of 16 GB DIMMs), so RAM capacity is at a premium even without mirroring. The Reliable Memory Technology essentially mirrors just a part of the memory address space, and places the hypervisor & all its processes there so that even if there are other RAM errors that take VMs down the hypervisor stays up. Think “controlled emergency landing” and not “crash landing.” And you don’t lose half your RAM.
Anyhow, that’s pretty cool, especially since it’s retroactive to all the 12th generation servers.
Memory reliability, also known as error insolation, allows ESXi to stop using
parts of memory when it determines that a failure might occur, as well as when
a failure did occur.
When enough corrected errors are reported at a particular address, ESXi stops
using this address to prevent the corrected error from becoming an uncorrected
error.
Memory
reliability provides a better VMkernel reliability despite corrected and
uncorrected errors in RAM. It also enables the system to avoid using memory
pages that might contain errors.
This below given procedure is used by hypervisor only when if you are not using reliable memory supported hardware.
Correct an
Error Isolation Notification
With
memory reliability, VMkernel stops using pages that receive an error isolation
notification.
The user receives an event in the vSphere Client when
VMkernel recovers from an uncorrectable memory error, when VMkernel retires a
significant percentage of system memory due to a large number of correctable
errors, or if there is a large number of pages that are unable to retire.
Procedure:-
| 1 |
Vacate
the host. |
| 2 |
Migrate
the virtual machines. |
|
3 |
Run
tests. |
vMotion migrations fail when using multiple VMkernel ports for vMotion in different IP subnets (2052092)
Symptoms
- When you attempt to migrate a virtual machine using vMotion and each of the VMkernel ports used for vMotion are in different VLANs or IP subnets, the operation fails.
- You see the error:
The vMotion migrations failed because the ESX hosts were not able to connect over the vMotion network. Check the vMotion network settings and physical network configuration. - When this issue occurs, the host has multiple VMkernel ports configured for vMotion.
Cause
- Multiple-NIC vMotion (introduced in vSphere 5.0): Multiple-NIC vMotion has specific requirements that must be adhered to for it to work correctly. In this case, all of the VMkernel ports configured for use with Multiple-NIC vMotion must be in the same IP subnet. If VMkernel ports are separated across subnets or VLANs, the service will not work correctly.
- Joining two separate environments with different vMotion networks: In this situation, a single host may have a VMkernel port in each of the two vMotion IP subnets/VLANs. If multiple VMkernel ports are selected for vMotion use, vMotion migrations may fail as the host can theoretically use either of the two VMkernel ports for vMotion purposes, and a connection may not be able to be established to the other hosts. The ability to select two VMkernel ports for vMotion purposes was introduced in vSphere 5.0 for Multiple-NIC vMotion purposes only.
Resolution
Do not use multiple VMkernel ports that have been configured for vMotion for any purpose other than Multiple-NIC vMotion. When using a single VMkernel port for vMotion, all hosts participating in vMotion migrations must also have their vMotion VMkernel interface in the same IP subnet/VLAN.
Wednesday, 18 June 2014
Can we keep RDM mapping files in NFS Datastore?

The VMkernel routes physical mode SCSI commands directly
over the RDM mapping without any modifications. The RDM vmdk pointer file must
reside on a VMFS location, therefore the operation fails because the NFS
protocol does not support SCSI commands over this interface.
When adding an RDM to a virtual machine hosted on an NFS datastore, the Store with Virtual Machine option is grayed out in the Add Raw Device Mapping wizard. Select a specific VMFS Datastore from the available list for the location of the pointer file instead. More Info is available in this KB article
When adding an RDM to a virtual machine hosted on an NFS datastore, the Store with Virtual Machine option is grayed out in the Add Raw Device Mapping wizard. Select a specific VMFS Datastore from the available list for the location of the pointer file instead. More Info is available in this KB article
1. This is to verify that VM datastore is NFS or not:-

2. First I tried to add the RDM by selecting this option keep the RDM mapping files in the same datastore as the others files are then this action is not allowed:-

3. Then finally I changed the datastore for RDM files to VMFS and other VM files are still in NFS and this action is now allowed:-

Sunday, 15 June 2014

Saturday, 14 June 2014



Wednesday, 11 June 2014
MAC Address Assignment from vCenter Server
vSphere 5.1 and later provides several schemes for automatic allocation of MAC addresses in vCenter Server. You can select the scheme that best suits your requirements for MAC address duplication, OUI requirements for locally administered or universally administered addresses, and so on.
■
| |
■
| |
■
|
After the MAC address is generated, it does not change unless the virtual machine's MAC address conflicts with that of another registered virtual machine. The MAC address is saved in the configuration file of the virtual machine.
Preventing MAC Address Conflicts
The MAC address of a powered off virtual machine is not checked against the addresses of running or suspended virtual machines.
When a virtual machine is powered on again, it might acquire a different MAC address. The change might be caused by an address conflict with another virtual machine. While this virtual machine has been powered off, its MAC address has been assigned to another virtual machine that has been powered on.
If you reconfigure the network adapter of a powered off virtual machine, for example, by changing the automatic MAC address allocation type or setting a static MAC address, vCenter Server resolves MAC address conflicts before the adapter reconfiguration takes effect.
For information about resolving MAC address conflicts, see the vSphere Troubleshooting documentation.
VMware OUI Allocation
VMware Organizationally Unique Identifier (OUI) allocation assigns MAC addresses based on the default VMware OUI 00:50:56 and the vCenter Server ID.
VMware OUI allocation is the default MAC address assignment model for virtual machines. The allocation works with up to 64 vCenter Server instances, and eachvCenter Server can assign up to 64000 unique MAC addresses. The VMware OUI allocation scheme is suitable for small scale deployments.
MAC Address Format
According to the VMware OUI allocation scheme, a MAC address has the format 00:50:56:XX:YY:ZZ where 00:50:56 represents the VMware OUI, XX is calculated as (80 + vCenter Server ID), and YY and ZZ are random two-digit hexadecimal numbers.
The addresses created through the VMware OUI allocation are in the range 00:50:56:80:YY:ZZ - 00:50:56:BF:YY:ZZ.
Prefix-Based MAC Address Allocation
On ESXi hosts 5.1 and later, you can use prefix-based allocation to specify an OUI other than the default one 00:50:56 by VMware, or to introduce Locally Administered MAC Addresses (LAA) for a larger address space.
Prefix-based MAC address allocation overcomes the limits of the default VMware allocation to provide unique addresses in larger scale deployments. Introducing an LAA prefix leads to a very large MAC address space (2 to the power of 46) instead of an universally unique address OUI which can give only 16 million MAC addresses.
Verify that the prefixes that you provide for different vCenter Server instances in the same network are unique. vCenter Server relies on the prefixes to avoid MAC address duplication issues. See the vSphere Troubleshooting documentation.
Range-Based MAC Address Allocation
On ESXi hosts 5.1 and later you can use range-based allocation to include or exclude ranges of Locally Administered Addresses (LAA).
You specify one or more ranges using a starting and ending MAC addresses, for example,(02:50:68:00:00:02, 02:50:68:00:00:FF). MAC addresses are generated only from within the specified range.
You can specify multiple ranges of LAA, and vCenter Server tracks the number of used addresses for each range. vCenter Server allocates MAC addresses from the first range that still has addresses available. vCenter Server checks for MAC address conflicts within its ranges.
When using range-based allocation, you must provide different instances of vCenter Server with ranges that do not overlap. vCenter Server does not detect ranges that might be in conflict with other vCenter Server instances. See the vSphere Troubleshooting documentation for more information about resolving issues with duplicate MAC addresses.
Info taken from VMware Documentation
Subscribe to:
Posts (Atom)