Translate

Total Pageviews

My YouTube Channel

Monday, 18 March 2019

NSX-T Configuring eBGP in Tier-0 Router - Part 16

To enable access between your VMs and the outside world, you can configure an external BGP (eBGP) connection between a tier-0 logical router and a router in your physical infrastructure.
When configuring BGP, you must configure a local Autonomous System (AS) number for the tier-0 logical router.  You must also configure the remote AS number of the physical router. The remote neighbor IP address. The neighbor must be in the same IP subnet as the uplink on the tier-0 logical router. BGP multihop is supported.

Prerequisites
  • Verify that the tier-1 router is configured to advertise connected routes.  This is not strictly a prerequisite for BGP configuration, but if you have a two-tier topology and you plan to redistribute your tier-1 networks into BGP, this step is required.
  • Verify that a tier-0 router is configured.
  • Make sure the tier-0 logical router has learned routes from the tier-1 logical router.  
If you missed previous parts in this blogpost series. Here is the Links:-
Part - 1
Part - 2
Part - 3
Part - 4
Part - 5
Part - 6
Part - 7
Part - 8
Part - 9
Part - 10
Part - 11
Part - 12
Part - 13
Part - 14
Part - 15 
  
How to Configure eBGP

1. Login to NSX Manager UI


 2. Routing > Routers > Select Tier-0 Router > Routing  > BGP


3. Enable the Status > Save

4. Under Neighbors > Click on Add > Configure Neighbor Address  and Remote AS


5. Configure Local Address > Add

6. Now Add the Second Address of Neighbor in same way as done in above steps


7. Now configure the Route Advertisement on Tier-1 Router
Select Tier-1 Router > Routing Tab > Route Advertisement

To provide Layer 3 connectivity between VMs connected to logical switches that are attached to different tier-1 logical routers, it is necessary to enable tier-1 route advertisement towards tier-0. You do not need to configure a routing protocol or static routes between tier-1 and tier-0 logical routers. NSX-T creates NSX-T static routes automatically when you enable route advertisement.

For example, to provide connectivity to and from the VMs through other peer routers, the tier-1 logical router must have route advertisement configured for connected routes. If you don't want to advertise all connected routes, you can specify which routes to advertise.

Prerequisites
  • Verify that VMs are attached to logical switches.
  • Verify that downlink ports for the tier-1 logical router are configured.


8. Enable Route Advertisement > Save

9. Now configure the Route Redistribution on Tier-0 Router.
Select Tier-0 > Route Redistribution

Prerequisites
  • Verify that the tier-0 and tier-1 logical routers are connected so that you can advertise the tier-1 logical router networks to redistribute them on the tier-0 logical router.
  • If you want to filter specific IP addresses from route redistribution, verify that route maps are configured. 

10. Edit > Enable Route Redistribution > Save


11. Click on Add > Configure what are routes you want to redistribute > Add

Select the source route check boxes you want to redistribute.
  1. Static - Tier-0 static routes.
  2. NSX Connected - Tier-1 connected routes.
  3. NSX Static - Tier-1 static routes. These static routes are created automatically.
  4. Tier-0 NAT - Routes generated if NAT is configured on the tier-0 logical router.
  5. Tier-1 NAT - Routes generated if NAT is configured on the tier-1 logical router.


NSX-T Connect Tier-1 Logical Router with Tier-0 Logical Router - Part 15

If you missed previous parts in this blogpost series. Here is the Links:-
Part - 1
Part - 2
Part - 3
Part - 4
Part - 5
Part - 6
Part - 7
Part - 8
Part - 9
Part - 10
Part - 11
Part - 12
Part - 13
Part - 14

In my previous posts i have discussed how to add Tier-1 and Tier-0 Router. Now in this post i will discuss how to connect Tier-1 to Tier-0, this is needed for connecting your Workloads (connected with Logical Switch) with Physical Infrastructure.

How to Connect Tier-1 to Tier-0

1. Login to NSX Manager UI

 
2.  Routing > Routers > Select Tier-1 Router > Click on Gear Icon > Connect to Tier-0 Router


3. Select Tier-0 Router > Click on Connect


NSX-T Add Tier-0 Logical Router - Part 14

Tier-0 logical router provides an on and off gateway service between the logical and physical network.
An NSX Edge cluster can back multiple tier-0 logical routers. Tier-0 routers support the BGP dynamic routing protocol and ECMP.

If you missed previous parts in this blogpost series. Here is the Links:-
Part - 1
Part - 2
Part - 3
Part - 4
Part - 5
Part - 6
Part - 7
Part - 8
Part - 9
Part - 10
Part - 11
Part - 12
Part - 13

How to Add Tier-0 Logical Router

Prerequisites
  • Verify that at least one NSX Edge is installed.
  • Verify that your NSX Controller cluster is stable.
  • Verify that an edge cluster is configured.  

1. Login to NSX Manager UI


2. Routing > Routers > Click on + Sign > Tier-0 Router > Configure Name, Select Edge Cluster and High Availability Mode (Active-Active or Active-Passive) > Add
By default, the active-active mode is used. In the active-active mode, traffic is load balanced across all members. In active-standby mode, all traffic is processed by an elected active member. If the active member fails, a new member is elected to be active.


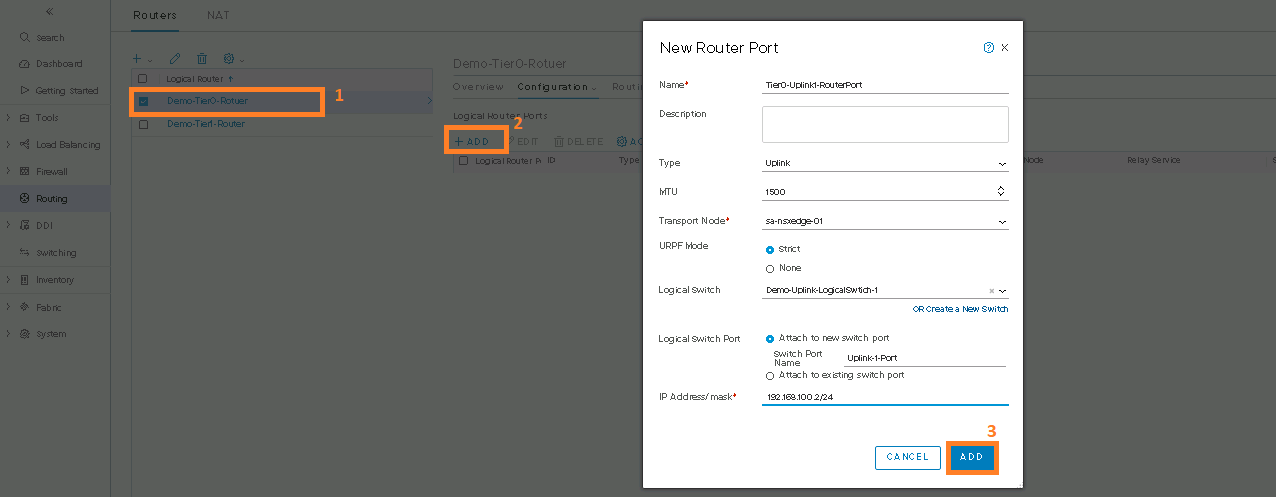
3. Add Uplink Router Port on Tier-0 Router


4. I have added two uplink ports. First One was discussed in above screenshot and second one is in below screenshot.


NSX-T Add Tier-1 Logical Router - Part 13

If you missed previous parts in this blogpost series. Here is the Links:-
Part - 1
Part - 2
Part - 3
Part - 4
Part - 5
Part - 6
Part - 7
Part - 8
Part - 9
Part - 10
Part - 11
Part - 12

How to Add Tier-1 Logical Router  

Prerequisites
  • Verify that the logical switches are configured.
  • Verify that an NSX Edge cluster is deployed to perform network address translation (NAT) configuration.
1. Login to NSX Manager UI


2.  Routing > Routers > Add > Tier-1 Router


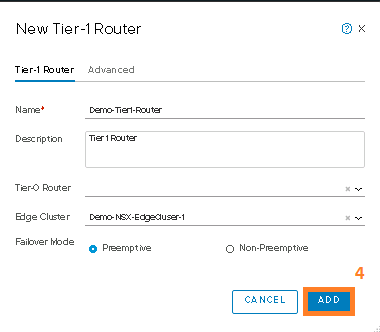
3. Configure Tier-1 Router Details


4.  Select New TIer-1 Router > Configuration > Router Ports

5.  Router Port is Needed for Connecting NSX-T Logical Switch to the Downlink of Tier-1 Router like in this example i have created router port to connect web logical switch. Configure Router Port Name, Type, URPF (Unicast Reverse Path Forwarding) Mode, Logical Switch, Router Port etc.


6. In the same way i have created Router Ports for DB and App Logical Switches

NSX-T Logical Router Introduction - Part 12

NSX-T Logical Router has two components:-
1. SR (Services Router)
2. DR (Distributed Router)


MPA = Management Plane Agent
LCP = Local Control Plane
CCP = Central Control Plane
  1. Use Creates Logical Router From NSX -T Manager UI
  2. Management Plane Pushes this Configuration to CCP via RMQ/TCP 5671
  3. CCP Pushes this configuration to LCP via NSX Channel
  4. DR gets created on all Transport Nodes
If you missed previous parts in this blogpost series. Here is the Links:-
Part - 1
Part - 2
Part - 3
Part - 4
Part - 5
Part - 6
Part - 7
Part - 8
Part - 9
Part - 10
Part - 11 

NSX-T Tiered Logical Routing Topology
Tier-1 
  • Tenant Level Logical Router.
  • Offers Gateway Services to Logical Switches.
  • Connects always with Tier-0 Logical Router.
Tier-0 
  • Provider Level Logical Router.
  • It provides connectivity to Phyiscal Network.
  • It supports eBGP.
  • It Supports ECMP.

NSX-T Logical Router Interfaces

Sunday, 17 March 2019

NSX-T Configure Edge Cluster - Part 11

A multi-node cluster of NSX Edges helps ensure that at least one NSX Edge is always available. In order to create a tier-0 logical router or a tier-1 router with NAT, you must associate it with an NSX Edge cluster. Therefore, even if you have only one NSX Edge, it must still belong to an NSX Edge cluster to be useful.

If you missed previous parts in this blogpost series. Here is the Links:-
Part - 1
Part - 2
Part - 3
Part - 4
Part - 5
Part - 6
Part - 7
Part - 8
Part - 9
Part - 10


Points to Remember
  • An NSX Edge transport node can be added to only one NSX Edge cluster.
  • An NSX Edge cluster can be used to back multiple logical routers.
  • After creating the NSX Edge cluster, you can later edit it to add additional NSX Edges. 
Prerequisites
  • Install at least one NSX Edge node.
  • Join the NSX Edges with the management plane.
  • Add the NSX Edges as transport nodes.
  • Optionally, create an NSX Edge cluster profile for high availability (HA) at Fabric > Profiles > Edge Cluster Profiles. You can also use the default NSX Edge cluster profile. 
How to Configure NSX Edge Cluster

1. Login to NSX Manager UI


 2.  Fabric > Nodes > Edge Clusters > Add > Configure Cluster Name, Choose Edge Cluster Profile (Default or Custom > Click on Edit to Choose Transport Nodes


3. Choose Transport Node Type > Select Transport Nodes > Ok


 4. Click on Add


NSX-T Promote NSX Edge Nodes as Transport Nodes - Part 10

A transport node is a node that participates in an NSX-T Data Center overlay or NSX-T Data Center VLAN networking.

If you missed previous parts in this blogpost series. Here is the Links:-
Part - 1
Part - 2
Part - 3
Part - 4
Part - 5
Part - 6
Part - 7
Part - 8
Part - 9

How to Promote NSX Edge Nodes as Transport Node
1. Login to NSX Manager UI


2. Click on Inventory > Nodes > Transport Nodes > Add > Configure Name, Select Node and Transport Zones.

If a VM requires access to the outside world, the NSX Edge must belong to the same transport zone that the VM's logical switch belongs to. Generally, the NSX Edge belongs to at least one VLAN transport zone to provide the uplink access.


3. Connect it with Overlay N-VDS


  4. Connect it with VLAN N-VDS

5. Promote Second Edge Node in Similar Way and once promoted both the nodes will be listed under transport nodes tab.


NSX-T Deploy NSX Edge Nodes - Part 9

  • NSX Edge is needed for establishing the external connectivity from NSX-T Datacenter Domain through Tier-0 Router.
  • It connects Isolated, Stub Networks to shared uplink networks by providing common gateway services for example NAT and Dynamic Routing.
  • It's Deployed in DMZ commonly and Multi-tenancy it offers logical boundry for each tenant.
  • It is mandatory to have Edge if one wants to offer stateful services such as NAT, VPN etc on Tier-0 or Tier-1 Routers.
If you missed previous parts in this blogpost series. Here is the Links:-
Part - 1
Part - 2
Part - 3
Part - 4
Part - 5
Part - 6
Part - 7
Part - 8 
Requirements to Deploy NSX-T Edge

Info Source - VMware Docs

For more info refer

Deployment of NSX Edge 
1. Login to NSX Manager UI


2. Click on Inventory > Nodes > Edges > Add Edge VM


3.  Enter the Basic Details and Select the Size Form Factor


4.  Enter Credential for admin user and root user


5. Configure the Deployment Details for NSX Edge  like vCenter, Host Cluster, Resource Pool, ESXi Host, Datastore Name etc.

6. Configure Network Details


7.  Deploy Second Edge VM in Similar way