Translate

Total Pageviews

My YouTube Channel

Friday, 31 May 2013

DRS VM to VM Anti-Affinity Rule Step by Step

1. Right Click on Datacenter ---> Click on New Cluster. Specify the Cluster Name and Turn on vSphere DRS.

2. Select the Required DRS Automation Level (For Example: Manual)


3.  Select Rules ---> Click on Add
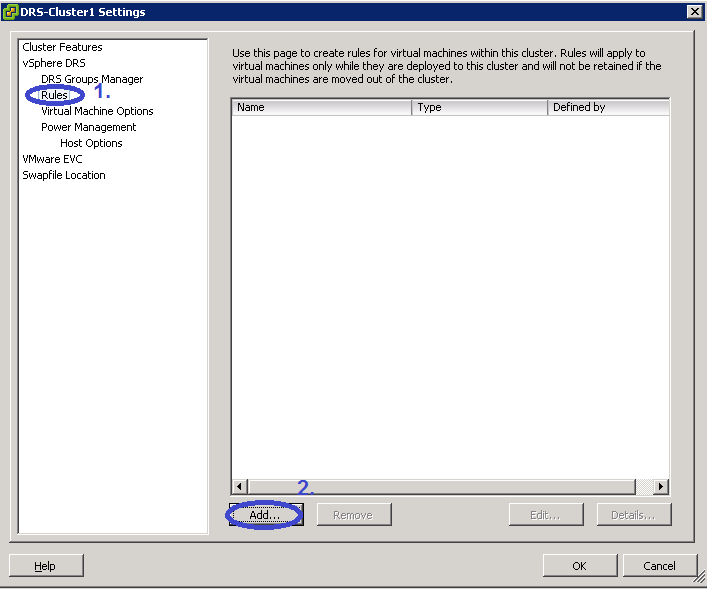
4.  Specify the Rule Name ---> Select the Rule Type ---> Click on Add Button ----> Select the VM's ---> Click on OK ---> Click on OK again.

5. Select the Cluster ---> Open the DRS Tab ---> Click on Apply Recommendations.

Tuesday, 28 May 2013

Cannot click vSphere Client Security Warning dialog buttons

Symptoms

  • When logging in with the vSphere Client you see a Security Warning dialog with a message similar to:
    An untrusted SSL certificate is installed on "<hostname>" and secure communication cannot be guaranteed. Depending on your security policy, this issue might not represent a security concern. You may need to install a trusted SSL certificate on your server to prevent this warning from appearing.
  • You cannot click any of the dialog buttons or move the dialog window.

Resolution

This issue occurs if:
  • You have a Message of the Day configured for your vCenter Server.

    And
  • You have Update Manager installed and have not acknowledged the Security Warning for it.

    And
  • You have not acknowledged the Security Warning for your vCenter Server.
This issue occurs because the Update Manager Security Warning is underneath the Security Warning displayed from vCenter Server. Although you cannot view the dialog, it must be canceled before you can proceed.

To cancel the dialog underneath the first Security Warning, press Alt+F4. This cancels the first dialog window (that is not visible) and allows you to acknowledge the Security Warning.

To resolve this issue temporarily, remove the Message of the Day, then add it back after you acknowledge the Security Warnings.

Even you can press the "ESC" Key 

Source:-

Monday, 20 May 2013

Configure a Client Device Type for the DVD/CD-ROM Drive


Select the mode used for the connection.
Passthrough IDE (raw). Use mode only for remote client device access.
Emulate IDE. Use to access a host CD-ROM device.
The host CD-ROM device is accessed through emulation mode. Passthrough mode is not functional for local host CD-ROM access. You can write or burn a remote CD only through pass-through mode access, but in emulation mode you can only read a CD-ROM from a host CD-ROM device.

Wednesday, 15 May 2013

Multiple-NIC vMotion in vSphere 5 (2007467)


Details

The release of vSphere 5.0 provided a number of new enhancements to vMotion. This article discusses the procedure for performing a vMotion across multiple NICs.
This article comes from a blog post by VMware Principal Architect Duncan Epping, http://www.yellow-bricks.com/2011/09/17/multiple-nic-vmotion-in-vsphere-5/.
Note: The preceding link was correct as of February 4, 2012. If you find the link is broken, provide feedback and a VMware employee will update the link.

Solution

Setting up multi-NIC vMotion in vSphere 5.x on a standard vSwitch


To set up Multi-NIC vMotion in vSphere 5.x on a Standard vSwitch:
  1. Log into the vSphere Client and select the host from the inventory panel.
  2. Click the Configuration tab and select Networking.
  3. Click Add Networking and choose VMkernel as the Connection Type.
  4. Click Next.
  5. Add two or more NICs to the required standard switch.

    Note: You can create a new vSphere standard switch or use an existing vSwitch.
  6. Name the VMkernel portgroup (for example, vMotion-01), and assign a VLAN ID as required.
  7. Click Use this port group for vMotion, then click Next.
  8. Configure the IP address and subnet mask, then click Next..
  9. Click the Properties tab of the vSwitch, select the vMotion-01 portgroup, and click Edit.
  10. Click the NIC Teaming tab.
  11. Under Failover Order, select Override switch failover order.
  12. Configure the first adapter (for example, vmnic1) as active and move the second adapter (for example, vmnic3) tostandby.
  13. Click OK.
  14. Under the vSwitch Properties, click Add to create a second VMkernel portgroup.
  15. Name the VMkernel portgroup (for example, vMotion-02), and assign a VLAN ID as required.

    Note: Ensure that both VMkernel interfaces participating in the vMotion have the IP address from the same IP subnet.
  16. Click Use this port group for vMotion, then click Next.
  17. Configure the IP address and subnet mask, then click Next.
  18. Click the Properties tab of the vSwitch, select the vMotion-02 portgroup, and click Edit.
  19. Click the NIC Teaming tab.
  20. Under Failover Order, select Override switch failover order.
  21. Configure the second adapter (for example, vmnic3) as active and move the first adapter (for example, vmnic1) tostandby.
  22. On the Properties tab of the vSwitch, select each vMotion portgroup in turn and confirm that the active and standby adapters are the reverse of each other.

Setting up multi-NIC vMotion in vSphere 5.x on a distributed vSwitch


To set up Multi-NIC vMotion in vSphere 5.x on a Distributed vSwitch:

  1. Log into the vSphere Client and click the Networking inventory.
  2. Click New vSphere Distributed Switch and choose version 5.0.0.
  3. Name the Distributed switch (for example, Multi-NIC-vMotion).
  4. Assign two uplink ports to the switch, then click Next.
  5. Select physical adapters to each of the hosts, then click Next and Finish.
  6. Expand the Distributed switch you just created, click the dvPortGroup and click Edit Settings.
  7. Name the dvPortgroup (for example, vMotion-01).
  8. Click VLAN and assign a VLAN ID as required.
  9. Click the Teaming and Failover tab, configure dvUplink1 as Active Uplink and move dvUplink2 to Standby Uplink.
  10. Right-click the Distributed vswitch, then click New Port Group.
  11. Name the dvPortgroup (for example, vMotion-02).
  12. Click VLAN and assign a VLAN ID as required, then click Next and Finish.
  13. Select the second portgroup created, then click the Teaming and Failover tab.
  14. Configure dvUplink2 as Active Uplink and move dvUplink1 to Standby Uplink.
  15. Go the Hosts and Clusters Inventory tab, select a host's Networking, and click vSphere Distributed Switch.
  16. Click Manage Virtual Adapters and click Add to add new virtual adapter.
  17. Choose VMkernel as the Virtual Adapter Type.
  18. Select the vMotion-01 portgroup, click Use this port group for vMotion, then click Next.
  19. Configure the IP address and subnet mask, then click Next and Finish.
  20. Add another virtual adapter, then select the vMotion-02 portgroup.
  21. On the Distributed vSwitch, select each dvportgroup on VMKernel Port vmk1 and vmk2 in turn, and confirm that the active and standby uplinks are the reverse of each other.

    Note: Ensure that both VMkernel interfaces participating in the vMotion have the IP address from the same IP subnet.

After making these configuration changes, when you initiate a vMotion, multiple NIC ports are used. Even when performing a vMotion on just one virtual machine, both links are used.

If you do not have dedicated links for vMotion, consider using Network I/O Control. vMotion can saturate a link. When you have set up Network I/O Control, and assigned the correct amount of shares, each type of traffic gets what it has been assigned.

Note: vMotion and IP-based storage traffic should not be routed, as this may cause latency issues. Any internal/private subnet can work as long as it is unique and dedicated exclusively to that specific type of traffic. Routed IP storage is not supported. Follow the recommendations for IP-based storage configuration published by VMware.
Source:-

Limits on Simultaneous Migrations


Each operation, such as a migration with vMotion or cloning a virtual machine, is assigned a resource cost. Each type of resource, such as host, datastore, or network, has a maximum cost that it can support at any one time. Any new migration or provisioning operation that would cause a resource to exceed its maximum cost does not proceed immediately, but is queued until other operations complete and release resources. Each of the network, datastore, and host limits must be satisfied for the operation to proceed.
Network limits apply to migrations with vMotion only. Network limits depend on both the version of ESXi and the network type.
Network Limits for Migration with vMotion lists network limits for migration with vMotion.
Network Limits for Migration with vMotion
Operation
ESX/ESXi Version
Network Type
Maximum Cost
vMotion
3.x
1GigE and 10GigE
2
vMotion
4.0
1GigE and 10GigE
2
vMotion
4.1, 5.0
1GigE
4
vMotion
4.1, 5.0, 5.1
10GigE
8
All migrations with vMotion have a network resource cost of 1.
Datastore limits apply to migrations with vMotion and with Storage vMotion. A migration with vMotion involves one access to the datastore. A migration with storage vMotion involves one access to the source datastore and one access to the destination datastore.
Datastore Limits for Migration with vMotion and Storage vMotion lists datastore limits for migration with vMotion and Storage vMotion. Datastore Resource Costs for vMotion and Storage vMotion lists the datastore resource costs for migration with vMotion and Storage vMotion.
Datastore Limits for Migration with vMotion and Storage vMotion
Operation
ESX/ESXi Version
Maximum Cost
vMotion/Storage vMotion
3.x
8
vMotion/Storage vMotion
4.0
8
vMotion/Storage vMotion
4.1, 5.0, 5.1
128
Datastore Resource Costs for vMotion and Storage vMotion
Operation
ESX/ESXi Version
Datastore Resource Cost
vMotion
3.x
1
vMotion
4.0
1
vMotion
4.1
1
Storage vMotion
3.x
1
Storage vMotion
4.0
1
Storage vMotion
4.1, 5.0, 5.1
16
Host limits apply to migrations with vMotion, Storage vMotion, and other provisioning operations such as cloning, deployment, and cold migration.
Host Limits for vMotion, Storage vMotion, and Provisioning Operations lists the host limits for migrations with vMotion, migrations with Storage vMotion, and provisioning operations. Host Resource Costs for vMotion, Storage vMotion, and Provisioning Operations lists the host resource cost for these operations.
Host Limits for vMotion, Storage vMotion, and Provisioning Operations
Operation
ESX/ESXi Version
Maximum Cost
vMotion
3.x, 4.0, 4.1, 5.0, 5.1
2, 2, 8, 8, 8, respectively
Storage vMotion
3.x, 4.0, 4.1, 5.0, 5.1
2
other provisioning operations
3.x, 4.0, 4.1, 5.0, 5.1
8
Source:

Saturday, 4 May 2013

Resource Pool Management Improvement in vSphere 5.x

You can create, manage and delete the Resource Pool, While you are managing stand-alone host esxi (before adding to vCenter Server). Once you add host to vCenter Server after that Resource pool management is only using vCenter, direct connection to host (esxi) do not allow resource pool management, until you remove host (esxi) from vCenter inventory. 

1. Suppose you created the resource pool via vCenter Server on your ESXi Host


2. Now try to change it via directly connecting with ESXi Host as soon as you will click on OK you will get the following message.

Friday, 3 May 2013

Filing a Support Request in My VMware (2006985)


Purpose

This article provides steps to file a Support Request in My VMware.
 
It helps you troubleshoot the Get Support process in My VMware and helps you understand which category to choose when filing a Support Request.
 
Note: To file a Technical Support Request, you require a support contract or Pay Per Incident Support. For more information about support contracts, see Support contract and renewals for VMware Products FAQ (2005844). For more information about about Pay Per Incident support, see Purchasing and filing Pay Per Incident support for VMware products (2014035). If you have a support contract or Pay Per Incident Support and are facing an issue related to product usage or installation, choose from theTechnical dropdown.

Details

Ways to file a Support Request

You can:
  • File a Support Request online – Filing a Support Request online is the fastest way to file a Support Request. When filing a Support Request online, you can choose from one of these categories:
All My VMware users can file Product Licensing or Account and General Inquiries Support Requests. Users with File Technical Support Requests permissions that have a support contract or that have purchased Pay Per Incident Support for a qualifying product can file a Technical Support Request.  
  • File a Support Request by phone – You can file a Support Request by phone if you have purchased Production, Basic, or Desktop Standard Support contract or if you have purchased Pay Per Incident Support for a qualifying product.
Initial response times by the Technical Support Engineer follow the guidelines for your specific support offering. Responses are either by phone, email, or a combination of both depending on what you specify in your Support Request and what your supportlevel allows. The response method for Fusion and Workstation Complimentary support is email-only. However, telephone support is available if you purchase Per Incident Support or Desktop Standard Support.
 

Filing a Technical Support Request

Choose from this dropdown if you experience an issue related to Fault/Crash, Installation, Networking, Operating System, Storage, or System Management.
 
To file a Technical Support Request, you need File Technical Support Requests permissions for the folder where the product and the support contract covering those products reside.
 
Note: To file a Support Request for SDK products, Fusion, and Workstation, you must first register the license keys. For more information, see Registering a license key in My VMware (2011177) (for SDK) and Registering for complimentary support in My VMware (2016092) (for Fusion and Workstation). 
 
To file a Technical Support Request:
  1. Log into My VMware.
  2. Select Support > Get Support from the main menu.
  3. Choose an option from the Technical dropdown.
  4. Choose the correct account from the dropdown.
  5. Select the product for which you are filing the Support Request and click Continue.

    Note: If no products display and you have access to multiple accounts, confirm that you selected the correct account. If the correct account is selected, see Product is not listed when filing a technical Support Request in My VMware (2009213) for reasons why products may not display.
  6. Provide a problem description. Use the exact error message to help VMware solve your issue. A list of suggested Knowledge Base (KB) articles displays.
  7. Review the KB articles to determine if they resolve your issue.
  8. Click descriptive tags, from the collection of tags below the problem description, to add them to the description. Adding tags leads to more relevant KB content.
  9. Review the updated list of KB articles to determine if they resolve your issue.
  10. If the KB articles do not resolve your issue, click Continue Support Request.
  11. If appropriate, associate the Support Request with a folder. Choose a folder from the dropdown.

    Note: Selecting a folder allows Administrators for that folder to view the Support Request. Administrators cannot modify the Support Request.
  12. Select your product version and severity.
  13. Provide a detailed issue description. Include any error messages, if applicable.

    Note: The problem description you entered in step 5 is carried over into this field.
  14. If appropriate, add any additional notes.
  15. Choose a preferred contact method.
  16. Confirm your country, preferred phone number and time zone. If these fields are blank, populate them.
  17. Provide a secondary email, alternate contact information, pager PIN, and third-party tracking number, if appropriate.
  18. If appropriate, click Add Attachment to add an attachment to your Support Request.

    Notes:
  19. Click Send Request.
  20. Review the Support Request Confirmation page and ensure all information is correct. VMware recommends that you record the Support Request confirmation number for future reference.

    Note: If you have filed the Support Request for the wrong account, see Changing account association in Viewing and updating Support Requests in My VMware (2007048).
  21. Click Support Request History to add additional attachments, change account association, close the support request, and request manager assistance (after the commit time has exceeded), and review Support Request details. For more information, see Viewing and updating Support Requests in My VMware (2007048).

Filing a Product Licensing or Account Support Request

Choose from the Product Licensing or Account dropdown if you experience issues related to Account Queries, Folder Management, License Management, OEM/Partner Activation Code (PAC), Per VM conversion, Product Activation, Transfer Licenses and Support, and User and Permissions Management.
 
You do not require active support to file a Product Licensing or Account Support Request.
 
To file a Product Licensing or Account Support Request:
  1. Log into My VMware.
  2. Select Support > Get Support from main menu.
  3. Choose an option from the Product Licensing or Account dropdown. A list of suggested Knowledge Base (KB) articles displays.
  4. Review the KB articles to determine if they resolve your issue.
  5. If the KB articles do not resolve your issue, click Continue Support Request.
  6. Ensure that the issue category is correct.
  7. Complete all mandatory fields.
  8. If appropriate, choose a different account from the Associate request with this account dropdown.
  9. If appropriate, associate the Support Request with a folder. Choose a folder from the dropdown.

    Note: Selecting a folder allows Administrators for that folder to view the Support Request. Administrators cannot modify the Support Request.
  10. If appropriate, add any additional notes.
  11. If appropriate, add a secondary email.
  12. If appropriate, click Add Attachment to add an attachment to your Support Request.

    Notes:
  13. Click Send Request. A License Support Representative will contact you within 12 business hours.
  14. Review the Support Request Confirmation page and ensure all information is correct. VMware recommends that you record the Support Request confirmation number for future reference.
  15. Click Support Request History to add additional attachments, change account association, close the support request, and review Support Request details. For more information, see Viewing and updating Support Requests in My VMware (2007048).

Filing a General Inquiries Support Request

Choose from the General Inquiries dropdown if you experience issues related to Communities, Downloads, Education, Evaluations, My VMware, Notifications, the Online Store, Partners, Product information, Sales, Support and Renewals, User Profile, or if you have feedback on the website.
 
You do not require active support to file a General Inquiries Support Request.
 
To file a General Inquiries Support Request:
  1. Log into My VMware.
  2. Select Support > Get Support from main menu.
  3. Choose an option from the General Inquiries dropdown. A list of suggested Knowledge Base (KB) articles displays.
  4. Review the KB articles to determine if they resolve your issue.
  5. If the KB articles do not resolve your issue, click Continue Support Request.
  6. Ensure that the issue category is correct.
  7. Provide a detailed issue description. Include any error messages, if applicable.
  8. If appropriate, add any additional notes.
  9. If appropraite, choose a different account from the Associate request with this account dropdown.
  10. If appropriate, associate the Support Request with a folder. Choose a folder from the dropdown.

    Note: Selecting a folder allows Administrators for that folder to view the Support Request. Administrators cannot modify the Support Request.
  11. If appropriate, provide a secondary email address.
  12. If appropriate, click Add Attachment to add an attachment to your Support Request.

    Notes:
  13. Click Send Request. A Customer Service Representative will contact you within 24 business hours.
  14. Review the Support Request Confirmation page and ensure all information is correct. VMware recommends that you record the Support Request confirmation number for future reference.
  15. Click Support Request History to add additional attachments, change account association, close the support request, and review Support Request details. For more information, see Viewing and updating Support Requests in My VMware (2007048).

Additional Information