
vRA7 is the latest version of vRealize Automation. Here i will discuss how one can install this
Minimum Requirements:-


9. Configure the required details > Click on Next

10. Enter Password for the service account > Click on Next

11. Click on Install

12. Once Installation is Completed > Click on Finish

13. Provide Time Server details > Click on Next

14. Run the prerequisite checker > once completed Click on Next
Another nice feature of vRealize Automation 7 is inclusion of the Prerequisite Checker which will ensure most the components required for a successful deployment are installed and properly configured.

15. Enter vRA Host Address > Click on Next

16. Configure Password > Click on Next

17. Enter IaaS Host details > Click on Next
Note:- You must enter the account in the form domain-name\user-name. Do not use a simple user

18. Enter Database Server Details > > Click on Next

19. Enter DEM details > Click on Next

20. Enter Endpoint details > Click on Next


31. Move to Catalog Tab > Request vSphere Initial Setup


 36. Once request is completed successfully > login to new Production named tenant
A vRealize Automation installation consists of the following
components:
• One
or more vRealize Automation appliances
• One
or more infrastructure-as-a-service (IaaS) servers
Minimum Requirements:-
vRealize Automation and the IaaS server have minimum
supported requirements.

vRA Installation Procedure:-

Procedure:-
1. Deploy vRA Appliance.
2. Once deployed > Open Internet Explorer > type https://vRAFQDN:5480
Username = root
Password = As Configured
First time anyone connects to the vRA on the port 5480 the installation wizard starts > Click on Next

3. Select I accept the license agreement > Click on Next

4. Select Deployment type like i selected Minimal Deployment > Click on Next
The Minimal deployment is perfect for testing, development,
and proofs of concept, while the Enterprise deployment should be used for
production or any deployment which may need high availability in the futre. The
interface is the same regardless of which deployment type is selected, though
there are some additional items with the Enterprise deployment. Additionally,
the Enterprise deployment goes beyond installation of all components - it
automatically clusters the services to provide high availability!

5. Install vRA Management Agent on vRA IaaS Server > Click on the link to download it.
A management agent must be pre-installed installed on each
IaaS component, allowing the Installation Wizard to take control of the machine
to automate configuration.

6. Now run the downloaded MSI Package > Click on Next

7. Select I accept license agreement > Click on Next

8. You can change destination folder > Click on Next

9. Configure the required details > Click on Next

10. Enter Password for the service account > Click on Next

11. Click on Install

12. Once Installation is Completed > Click on Finish

13. Provide Time Server details > Click on Next

14. Run the prerequisite checker > once completed Click on Next
Another nice feature of vRealize Automation 7 is inclusion of the Prerequisite Checker which will ensure most the components required for a successful deployment are installed and properly configured.
- After the prerequisite checker runs it will provide a detailed list of the components or modules that were checked and then identifies criteria that have not been met.
- Pressing the Fix button triggers a process that corrects the issues which have been identified. This is a huge time saver!

15. Enter vRA Host Address > Click on Next

16. Configure Password > Click on Next

17. Enter IaaS Host details > Click on Next
Note:- You must enter the account in the form domain-name\user-name. Do not use a simple user
name (with no domain). Do not enter the user name in the form user-name@domain-name.
Failure to enter the user name in the correct format results in an installation failure.
Failure to enter the user name in the correct format results in an installation failure.
The database security passphrase must be carefully entered
and recorded. You cannot recover
the database security passphrase if you lose it.
the database security passphrase if you lose it.

18. Enter Database Server Details > > Click on Next

19. Enter DEM details > Click on Next

20. Enter Endpoint details > Click on Next
Note: The name that you use for the VMware vCenter Server®
endpoint is critical. Record the
endpoint name. In several other places in vRealize Automation, you must know the name that
you assigned to the vCenter Server endpoint. The default endpoint name is vCenter. But if you
use multiple vCenter Server endpoints, each endpoint must have a unique name.
endpoint name. In several other places in vRealize Automation, you must know the name that
you assigned to the vCenter Server endpoint. The default endpoint name is vCenter. But if you
use multiple vCenter Server endpoints, each endpoint must have a unique name.

21. Provide details for Generating the vRealize Appliance Certificate > Save Generated Certificate > Click on Next

22. Provide details for Generating the Web Certificate > Save Generated Certificate > Click on Next

23. Provide details for Generating the Manager Service Certificate > Click on Next

24. You can take the snapshot of vRA Appliance and all your servers to revert them back if installation fails > Click on Next

25. Click on Install > Click on Next

26. Configure License Key > Click on Next

27. Click on Next

28. Click on Initial Content Configuration > Click on Next

29. Click on Finish

30. Run Initial Setup by connecting to https://vRAFQDN/vcac


32. Provide details for creating new tenant > Click on Next

33. Provide the Endpoint details > Click on Next

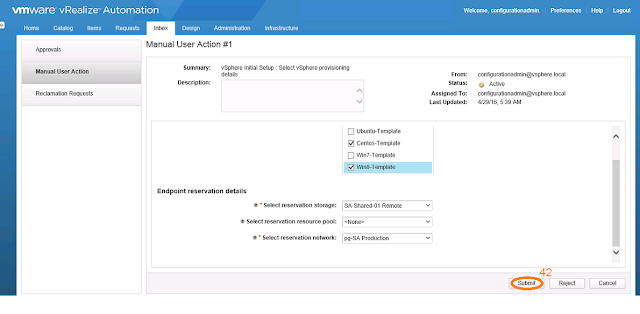
34. Open Inbox Tab > Manual User Action > Click on View Details

35. Select required details > Click on Submit

https:://vRAFQDN/vcac/org/production
Now verify the settings of this default tenant