
vSphere Auto Deploy can provision hundreds of physical hosts with ESXi software. You can specify the image to deploy and the hosts to provision with the image. Optionally, you can specify host profiles to apply to the hosts, and a vCenter Server folder or cluster for each host.
When a physical host set up for Auto Deploy is turned on, Auto Deploy uses a PXE boot infrastructure in conjunction with vSphere host profiles to provision and customize that host. No state is stored on the host itself. Instead, the Auto Deploy server manages state information for each host
Auto Deploy stores the information for the ESXi hosts to be provisioned in different locations. Information about the location of image profiles and host profiles is initially specified in the rules that map machines to image profiles and host profiles. When a host boots for the first time, the vCenter Server system creates a corresponding host object and stores the information in the database.


Open vSphere Web Client > System Configuration

Services > Select Image Builder Service and Auto Deploy Service One by one > Edit Startup Type

2. Add Software Depot
Click on Auto Deploy Icon > Software depots tab > Type name of your software depot and File needed for software depot > Click Upload


You can create custom depot as shared in the screenshot

3. Create Custom Image Profile and Export it
Click on one of the software depot > Select One of the image profile > Clone

Assign the name to new image profile, select software depot in which you want to keep this new image profile > Next

Select your software packages > Next

Click Finish

Export Image Profile in ZIP format. Select ZIP > Generate Image > Close


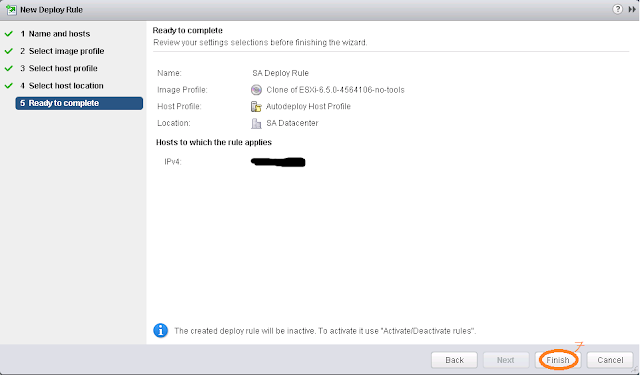
4. Create Deploy Rule
Add new deploy rule > select image profile > select host profile > select folder to keep the new deployed esxi hosts through Auto Deploy > Finish.


5. Activate Deploy Rule
Select Deploy Rule > Activate > Finish


6. Configure DHCP for PXE Boot
Add Boot Server Host Name (TFTP Server Name), Boot File Name (PXE Boot File Name)

7. Start TFTP Service
8. Now boot your PC with network card to test your configuration.
When a physical host set up for Auto Deploy is turned on, Auto Deploy uses a PXE boot infrastructure in conjunction with vSphere host profiles to provision and customize that host. No state is stored on the host itself. Instead, the Auto Deploy server manages state information for each host
Auto Deploy stores the information for the ESXi hosts to be provisioned in different locations. Information about the location of image profiles and host profiles is initially specified in the rules that map machines to image profiles and host profiles. When a host boots for the first time, the vCenter Server system creates a corresponding host object and stores the information in the database.

Stateless Mode:-
Stateless is a mode of execution for ESXi hosts with no
local storage.
Stateless Caching Mode:-
vSphere Auto Deploy stateless caching saves the image and
configuration to a local disk, but the host continues to perform stateless
reboots.
Stateful Mode:-
The ESXi host initially boots using vSphere Auto Deploy. All
subsequent reboots use local disks.
Because vSphere Auto Deploy can be configured without a boot
disk, all information on the state of the host is stored in or managed by
vCenter Server.
Components in Auto Deploy Architecture:-

1. Start Auto Deploy Service
Open vSphere Web Client > System Configuration

Services > Select Image Builder Service and Auto Deploy Service One by one > Edit Startup Type

2. Add Software Depot
Click on Auto Deploy Icon > Software depots tab > Type name of your software depot and File needed for software depot > Click Upload


You can create custom depot as shared in the screenshot

3. Create Custom Image Profile and Export it
Click on one of the software depot > Select One of the image profile > Clone

Assign the name to new image profile, select software depot in which you want to keep this new image profile > Next

Select your software packages > Next

Click Finish

Export Image Profile in ZIP format. Select ZIP > Generate Image > Close


4. Create Deploy Rule
Add new deploy rule > select image profile > select host profile > select folder to keep the new deployed esxi hosts through Auto Deploy > Finish.


5. Activate Deploy Rule
Select Deploy Rule > Activate > Finish


6. Configure DHCP for PXE Boot
Add Boot Server Host Name (TFTP Server Name), Boot File Name (PXE Boot File Name)

7. Start TFTP Service
8. Now boot your PC with network card to test your configuration.