When setting up a multi-cell vCloud Director environment you will need to create a shared area to store the transfer folder that is used whenever something is uploaded to a vCloud Director cell, such as an ISO or an OVF template.
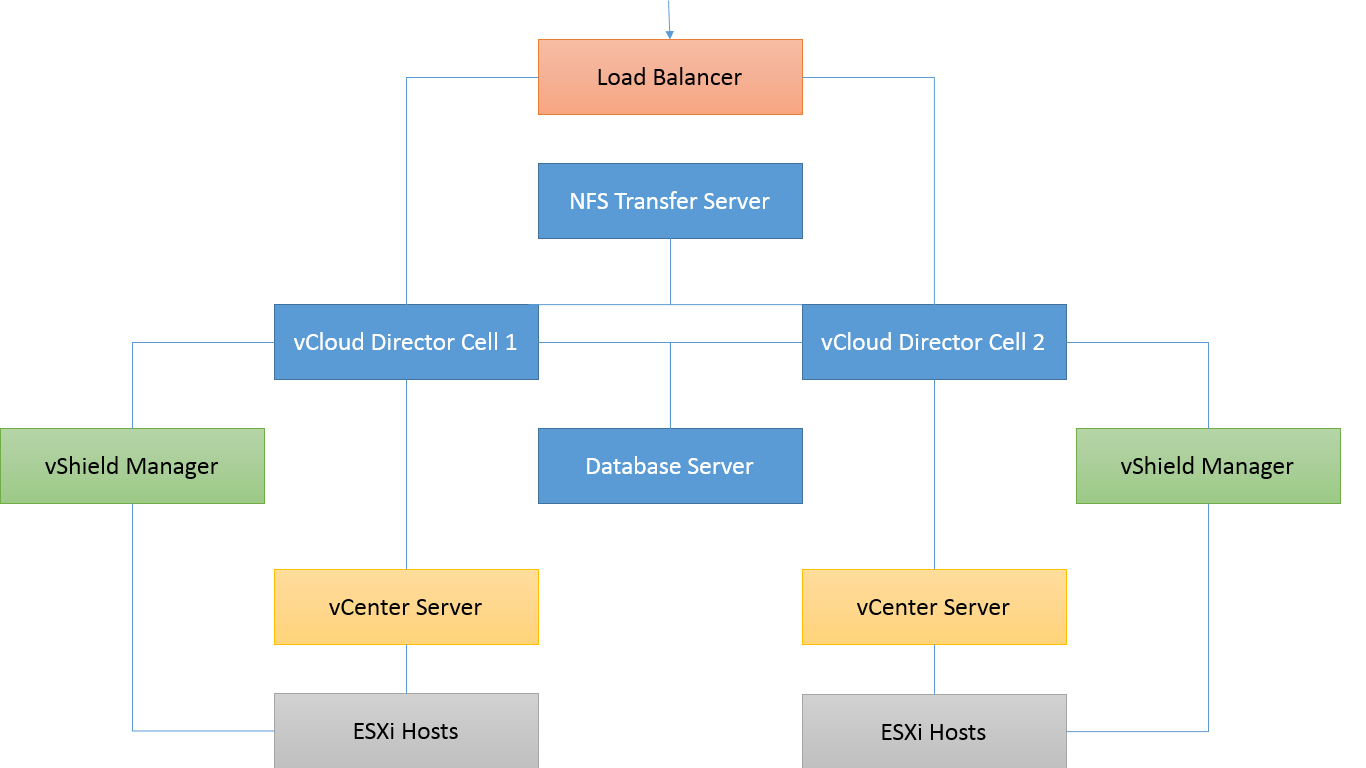
The diagram below shows a typical multi-cell, multi-vCenter setup.
In order to create the share we can use a CentOS virtual machine as the shared area. Any NFS mount will suffice provided that it allows for ownership of folders to be set. This guide will assume you have already created the NFS share.
This guide also assumes this is being run on a new vCD cell. If you have already deployed vCloud Director take a backup of the contents of the /opt/vmware/vcloud-director/data/transfer folder before you start otherwise any uploaded content that hasn’t yet been copied to a datastore will be lost.
Also if the cell already exists you can skip step 1. Just make sure to stop the cell service first. service vmware-vcd stop
The steps to be performed on the vCD cells are:-
Create the transfer folder. mkdir -p /opt/vmware/vcloud-director/data/transfer
Mount the NFS share to the new folder location. mountnfshost.fqdn.or.ippaddr:/nfs.export.name /opt/vmware/vcloud-director/data/transfer
Use VI to edit the fstab file to auto mount the NFS share upon start up. You can also use winSCP to edit this file. vi /etc/fstab
Add the following line to the fstab file. nfshost.fqdn.or.ippaddr:/nfs.export.name/opt/vmware/vcloud-director/data/transfer nfs rw 00
Save the file and exit : wq
Take ownership of the folder and contents chown -R vcloud:vcloud /opt/vmware/vcloud-director/data/transfer/*
Install vCloud Director as normal. For an existing cell, restart the vCD service. service vmware-vcd start
Virtual Volumes (VVol) are about making the storage system VM-centric, in other words, making the VMDK a first class citizen in the storage world. Right now, everything is primarily LUN-centric or volume-centric, especially when it comes to snapshots, clones and replication.
With VVol most of the data operations can be offloaded to the storage arrays. In this new approach, we have made storage arrays aware of VMDKs so the data operations, data capacity and communication mechanisms can be managed between vSphere and the VVol.
In order to provide management capabilities for the operations listed above, we introduced the following concepts:
Vendor Provider (VP) management of data operations
Storage Containers (SC) management of data capacity
Protocol Endpoints (PE) management of access control and communications
A Vendor Provider is a plug-in that is built by a storage vendor. This plug-in uses a set of out-of-band management APIs called VASA. The VP is able to export storage array capabilities and present them to vSphere through the VASA APIs.
Storage Containers (SC)
Storage Containers are equivalent to datastores in a sense, but they are focused around the allocation of chunks of physical storage. Storage Containers are based on the grouping of VMDKs which are then used for application-specific SLAs and are translated into capabilities through the VASA APIs.
Protocol Endpoint (PE)
Protocol Endpoints are the access points from the hosts to the storage systems and are created by storage administrators. All path and policies are administered by Protocol Endpoints. Protocol Endpoints are compliant with both iSCSI and NFS. They are intended to replace the concept of LUNs and mount points.
Download this PDF to know more about Virtual Volumes
VMworld vVOL Deepdive Video:-
In this lab you will have the opportunity configure a non-vendor specific implementation of virtual volumes (vvol).
1. Launch the Firefox browser from the desktop
2. Select the "Use Windows session authentication" or you can chose to enter Administrator@corp.local and VMware1! in User name and Password text box respectively.
3. Click "Login"
Note: Please click the "Allow" button in Firefox and choose to "Allow and Remember" for all plugins. Then refresh the browser. This will make the "Use Windows session authentication" option available.
Once you have logged into the vSphere Web Client, select the Hosts and Clusters from the Home menu
Vendor providers (VP) are plug-ins that are built by the storage vendors.
This plug-in utilizes a set of out-of-band management APIs, VASA.
The VP is able to export storage array capabilities and present them to vSphere through the VASA APIs.
1. Select vCenter Server called vcsa-01a.corp.local
2. Select Manage tab
3. Select Storage Providers
1. Click the green +to add a Storage Provider
2. In the New Storage Provider dialog, enter the following details
The Storage Provider will be registered and will appear in the list of Storage Providers.
Perform a rescan of the storage provider if the NAS_SCST_ARRAY, IT_Dept_Array_3 and iSCSI_SCST_ARRAY are not automatically displayed.
To perform a rescan click on the third button from the left side of the screen below the Storage Providers menu.
The VVOL appliance is both a NAS Storage Array and an iSCSI Storage Array.
DISPLAY PROTOCOL ENDPOINTS
Lets recap on what Protocol Endpoints are. - Protocol endpoints are the access points from the hosts to the storage systems, which are created by storage administrators. All path and policies are administered by protocol endpoints. Protocol Endpoints are compliant with both, iSCSI and NFS. They are intended to replace the concept of LUNs and mount points. In the last step we said that this VVOL Storage appliance is both a NAS Storage Array and an iSCSI Storage Array.
To be able to add iSCSI datastores, we need to have an iSCSI Adapter on our ESXi Host.
In this environment, we have already added the iSCSI adapter to two of the ESXi Hosts (esx-02a.corp.local and esx-03a.corp.local), but lets have a look at the adapter details.
1. Select ESXi host - esx-02a.corp.local
2. Select Manage
3. Select Storage
4. Select Storage Adapters
5. Scroll down the Storage Adapter list until you see vmhba33 which is our iSCSI Software Adapter
DISPLAY PROTOCOL ENDPOINTS - ISCSI DEVICES
1. Select the Devices tab.
2. Two Protocol Endpoint devices should be available as illustrated.
CREATE VVOL STORAGE CONTAINERS
VVol Storage Containers (SC) are a logical management construct for grouping virtual machines or VMDKs from which application specific service requirements are translated to storage and service capabilities through the VASA APIs. Storage containers are similar to the concept of datastores in a sense, but focus around the allocation of chunks of physical storage.
Select the host called esx-01a.corp.local
Select Manage
Select Storage
Select Storage Adapters
Select the green + icon to Add a new storage adapter
Select Software iSCSI adapter
A new software iSCSI adapter will be added to the list.
Click OK
In the Storage Adapters, scroll down to find the iSCSI Adapter that you just added.
The iSCSI Adapter will be called vmhba33
Select the Targets Tab
Select DynamicDiscovery
Click Add button to enter the FQDN or IP Address of the iSCSI send target server
The iSCSI Send Target for this environment is vvol-sample-001.corp.local
Enter vvol-sample-001.corp.local for the iSCSI Server, leave the iSCSI Port as 3260
Click OK
After the iSCSI Target has been successfully added, select the iSCSI Software Adapter from the Storage Adapters window and perform a rescan storage operation in order to identify and display the storage containers from the VMware Storage Provider
After the iSCSI Target has been successfully added, select the iSCSI Software Adapter from the Storage Adapters window and perform a rescan storage operation in order to identify and display the storage containers from the VMware Storage Provider
CREATE AN ISCSI VVOL STORAGE CONTAINER - NEW DATASTORE
1. Select the Cluster called Cluster Site A
2. Right click the Cluster and select Storage ->New Datastore
Click Next on the Location screen
In the New Datastore - Type, select VVOL
Click Next
In the Name and container selection, for the Backing Storage Container, select ISCSI-VVOL
Change Datastore name from the default name of "Datastore" to "ISCSI-VVOL"
Click Next
In the Select Hosts accessibility screen, select the check box to select all three ESXi hosts.
We will give all three ESXi hosts access to this datastore.
Click Next
You can review your changes.
On the ready to complete screen, click Finish
The Create VVOL datastore task will complete
1. Select the Cluster named Cluster Site A
2. Select Related Objects
3. Select Datastores
4. Here you will see the ISCSI-VVOL datastore that you just created.
1. Select the Cluster called Cluster Site A
2. Right click the Cluster and select Storage ->New Datastore
Click Next on the Location screen
In the New Datastore - Type, select VVOL
Click Next
In the Name and container selection, for the Backing Storage Container, select NFS-VVOL
Enter NFS-VVOL as the Datastore name
Click Next
In the Select Hosts accessibility screen, select all three ESXi hosts.
We will give all three ESXi hosts access to this datastore.
Click Next
You can review your changes.
On the ready to complete screen, click Finish
The Create VVOL datastore task will complete
1. Select the Cluster named Cluster Site A
2. Select Related Objects
3. Select Datastores
4. Here you will see the NFS-VVOL datastore that you just created.
Storage Based Policy Management
ENABLING VIRTUAL MACHINE STORAGE POLICIES
To enable VM Storage Policies on the cluster. Navigate to the Home page > click on the VM Storage Policies icon.
In the VM Storage Policies screen, click the icon illustrated in the red square above.
If the VM Storage Policy is not enabled on the Cluster, perform the following task
1. Select the vCenter > vcsa-01a.corp.local > Cluster Site A
2. Click Enable
Then click Close at the bottom
To create a VM Storage policy, Click on the icon illustrated in the red square.
Select the vCenter Server : vc-01a.corp.local
Name the policy “Gold” and add profile description Gold Profile IOPS
Click Next
Click Next
Following the wizard and click Next on the Rule-Sets page
Select > VVOL from the Rules based on vendor-specific capabilities drop down.
Add the following capabilities and apply settings Read OPS (min - max) : 50-100 Write OPS (min - max) : 50-99
Click Next
Identify the VVol storage containers compatible with the VM Storage Policy.
By selecting the Compatible option, the Compatible storage, in this case VVols, are shown in the lower half of the screen:
Click Next
Confirm that the information above is correct and click Finish to create the VM Storage Policy
TheGoldVM Storage Policy will appear in the
list of VM Storage Policies
To create a VM Storage policy, Click on the icon illustrated in the red square.
Type Silver in the Name field
Type Medium IOPS with snapshot in the Description field
Click Next
Click Next
Follow the steps utilized in the exercise above and create two more VM Storage Policies.
Select "Rules based on vendor-specific capabilities" VVOL and add the following capabilities & settings. Read OPS (min - max) : 10 - 45 Write OPS (min - max) : 25 - 55 Snapshot: Yes
Click Next
Identify the VVol storage containers compatible with the VM Storage Policy.
By selecting the Compatible option, the Compatible storage, in this case VVols, are shown in the lower half of the screen:
Click Next
Confirm that the information below is correct and click Finish to create the VM Storage Policy
The creation of the Bronze storage policy is optional. This policy illustrates additional capabilities that may be available by your Storage Provider.
Type Bronze in the Name field
Type Low IOPS with de-duplication and encryption in the Description field
Click Next
Click Next
Follow the steps utilized in the exercise above and create two more VM Storage Policies.
Select "Rules based on vendor-specific capabilities" VVOL and add the following capabilities & settings. Read OPS (min - max) : 25 - 35 Write OPS (min - max) : 20 - 45 Encryption : Yes De-duplication : Yes
Click Next
Identify the VVol storage containers compatible with the VM Storage Policy.
By selecting the Compatible option, the Compatible storage, in this case VVols, are shown in the lower half of the screen:
Click Next
Confirm that the information below is correct and click Finish to create the VM Storage Policy
UTILIZING VVOL DATASTORES
This step will show how administrators can migrate VMs between traditional datastores and VVols containers.
This step will show how administrators can migrate VMs between traditional datastores and VVols containers.
Navigate to the Cluster Site A > Related Objects > Virtual Machine
Power On the following Virtual Machine
base-sles-01a
Right click on base-sles-01a Virtual Machine
Select Migrate
In the migration wizard select > Change storage only
Click Next
Choose a VM Storage Policy> Gold
Select the NFS-VVOL from the list of Compatible VVols
Click Next
Click Finish
Click on the VM base-sles-01a which we just Storage vMotioned.
Click on the Summary tab
If the VM Storage Policy Compliance is Not Applicable, we have to run a Check Compliance which will refresh the compliance state of this VM
Click on Gold
Click on Summary tab
Click on Check Compliance
This will ensure that the VM Storage Policy shows as Compliant.
We can go back to the VM Summary page and check for the compliance status as show in the previous screen.
CREATE SNAPSHOT OF A VM IN A VVOL CONTAINER - HOSTS AND CLUSTERS
When the VM has completed migration to the NFS VVol, go to the VMs list
Select base-sles-01a
Right click and select Take Snapshot from the menu
Populate the required details for snapshot name > VVOL VM Snapshot
Description : VVol Snapshot for VMWorld/PEX
Deselect the option to Snapshot the virtual machine's memory
Click OK
To migrate a VM go to the list of VMs
Select base-sles-01a
Right Click and select Migrate
Select Change storage only
Click Next
Select Silver from the VM Storage Policy drop down menu
Select Thin Provision from the Select virtual disk format drop down menu
Choose ISCSI-VVOL data-store
We should see the data-store is Compatible with the Silver policy
Click Next
Click Finish
Once the storage vMotion completes, take a note of the Location and Storage
If the VM Storage Policy Compliance shows Noncompliant, click on Silver and run Check Compliance as shown in one of the previous steps
Want to do Hands-On @ your own follow this link
Search HOL-SDC-1429 - Virtual Volumes


