
Next-generation mobile solutions are unlocking new levels of workforce productivity, introducing new ways to connect and build relationships with customers while helping organizations to grow and transform their markets.
AirWatch by VMware offers the industry's broadest, most respected portfolio for enterprise mobility management and security. This complete platform, spanning mobile device management, mobile application management, secure email and browsing and secure content and collaboration gives you a powerful platform to accelerate your next generation mobile strategy.
Mobile Device Management
AirWatch Mobile Device Management enables businesses to address challenges associated with mobility by providing a simplified, efficient way to view and manage all devices from the central admin console. Our solution enables you to enroll devices in your enterprise environment quickly, configure and update device settings over-the-air, and secure mobile devices.
Mobile Applications Management
AirWatch Mobile Application Management addresses the challenge of acquiring, distributing, securing and tracking mobile applications. Distribute, update, track and recommend apps with the AirWatch App Catalog. Provide a way for businesses and educational institutions to purchase apps in bulk and distribute them across their organization with the Apple Volume Purchase Program (VPP). Build custom business apps with the AirWatch Software Development Kit, or wrap existing internal applications for advanced security with AirWatch App Wrapping. AirWatch App Reputation Scanning allows IT to identify common app risks, such as access to privacy settings, insecure network connections, malicious code and more.
Mobile Content Management
AirWatch Mobile Content Management enables secure mobile access to content anytime, anywhere. An enterprise-grade file sync and share solution, AirWatch Secure Content Locker protects your sensitive content in a corporate container and provides users with a central application to securely access and collaborate on the latest sales materials, board books or financial reports from their mobile devices.
Mobile Email Management
AirWatch Mobile Email Management delivers comprehensive security for your corporate email infrastructure. With AirWatch, you can control which mobile devices access email, prevent data loss, encrypt sensitive data, enforce advanced compliance policies and allow users to easily sync email through the self-service portal. AirWatch supports native email clients, enterprise services, cloud-based clients, as well as our own client, AirWatch Inbox.
1 - BASIC ENROLLMENT AND MDM SETUP
LAB SANDBOX AND AIRWATCH ADMIN CREATION
CREATE A SANDBOX IN THE AIRWATCH SAAS HOL ENVIRONMENTLaunch the AirWatch HOL Sandbox Creator application located on the ControlCenter Desktop. This will allow you to create a "sandbox" inside the AirWatch HOL SaaS Environment.

FIll in your information into the fields. The AirWatch Admin Account is the account that you are creating to log into the AirWatch Administration Console. It is recommended that you use your email address which you used to login to these Hands On Labs as this needs to be unique in the AirWatch instance.
NOTE: DO NOT USE AN EMAIL ADDRESS YOU KNOW IS ALREADY ASSOCIATED TO AN AIRWATCH INSTANCE!
- Enter yourFirst Name. This can be whatever you like here.
- Enter yourLast Name. This can be whatever you like here.
- Enter yourEmail Address. This should be your email address which you used to login to these Hands On Labs. If your email address contains any special characters (including a period '.') before the @ sign, please do not include it here. For example, "test.user@email.com" should be changed to "testuser@email.com". The text before the @ sign is used by this application to create the "Group ID" which does not allow for special characters.
- Enter your Company. This can be whatever you like here.
- Enter an Admin Account. It is recommended to use youremail address which you used to login to these Hands On Labs. DO NOT USE "ADMIN" AS THIS WILL FAIL!!
- Enter an AirWatch Admin Account Password. This should be an easy to remember password (i.e."VMware1!").
- Re-enter Account Password.This needs to match the above (i.e."VMware1!").
- Click the Go button. PLEASE ONLY CLICK THE "GO" BUTTON ONCE!!
- The Group ID will be auto generated. Please note your Group ID as this ID will be needed in later sections.
Minimize the VMworld AirWatch HOL Sandbox Creator application.
After clicking Go, you will see notifications of the process within the "Go" button and, when successfully completed, you will see

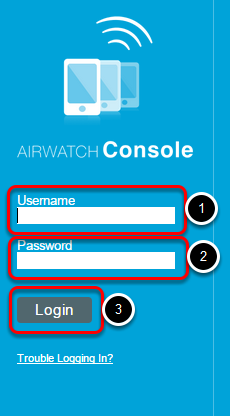
Open FireFox on the Lab Desktop. The default home page for the browser is https://hol.awmdm.com which will display the image shown. Enter your AirWatch Admin Account information which you created in the previous step and click the "Login" button.
- Enter your Username. This is the same Admin account that you created in the earlier step.
- Enter Password: this is the same Admin password you created in the earlier step.
- Click the Login button.
The follow 4 steps of logging into the Administration Console will only need to be done during the initial login to the console.
You will be presented with the AirWatch "Terms of Use", click on the "Accept" button.
NOTE: Due to lab restrictions, you may need to wait here for a minute or so while the Hands On Lab contacts the AirWatch Hands On Labs server.

After accepting the "Terms of Use" you will be presented with a "Security Settings" pop-up. The Password Question is in case you forget your admin password and the Security PIN is to protect certain administrative functions in the console.
- Pick a question from the "Password Question" drop-down (default selected question is ok here).
- Enter your answer in the fields (i.e. "VMware1!").
- Confirm (i.e. "VMware1!").
- Input a PIN in the "Security PIN" fields, it must be at least 4 digits (i.e. "1234").
- Confirm Security PIN (i.e. "1234").
- Click on the "Save" button when done.

After completing the Security Settings, you will be presented with the AirWatch 7 Console Welcome pop-up.
- Click on the "Don't show this message again" check box.
- Close the pop-up by clicking on the "X" in the upper-right corner.

In the console,
- Click on “Accounts” in the far left column.
- Next click on “List View” in the second column then...
- Hover the mouse over “Add” in the menu bar.
- Select "Add User" in the drop down.

- Ensure "Basic" is selected for the Security Type.
- Enter a Username (Example: "TestUser").
- Enter a Password (Use VMware1!).
- Confirm the Password (Use VMware1!).
- Enter a First Name (Example: "Test").
- Enter a Last Name (Example: "User").
- Enter an Email Address for the user.
- Click “Save”.

IOS ENROLLMENT AND MDM
In the next few steps you will create an iOS profile and review the restrictions. For this lab the Camera will be disabled for the iOS devices.NOTE: When disabling the camera on iOS, other applications such as FaceTime and Photo Booth are also disabled.

- Click on Groups & Settings
- Click on Groups
- Click on Smart Groups
- Click on Add Smart Group

- Enter "All Devices" in the Name field.
- Click on the Save button.

- Click on “Devices” in the far left column.
- Next click on "Profiles" to expand it.
- Click on the "List View” option under"Profiles" in the second column.
- Click on “Add” in the menu bar.

For this lab, select "Apple iOS".

After clicking on the iOS icon, you will be presented with the “Add a New Apple iOS Profile”. All profiles are broken down into two basic sections, the “General” section and the “Payload” section.
The “General” section has information about the Profile, its name and some filters on what device will get it.
The “Payload” sections define actions to be taken on the device.
Every Profile must have all required fields in the “General” section properly filled out and at least one payload configured.
NOTE: It is recommended a Profile contain only one payload.

- Click on “General” if it is not already selected.
- Give the profile a name such as “iOS No Camera” by entering the string "iOS No Camera" in the “Name” field.
- Copy the profile name into the Description field.
- Click in the Assigned Smart Groups field. This will pop-up the list of created Smart Groups. Click on the "All Devices" Smart Group you created in a previous step.
Click to the NEXT STEP in the lab manual to continue configuration of the profile.

NOTE: When initially setting a payload, a "Configure" button will show to reduce the risk of accidentally setting a payload configuration.
- Click on the "Restrictions" payload in the "Payload" section on the left.
- Click the "Configure" button to continue setting the Restrictions payload.

- Click on the check box next to the “Allow use of camera” which will un-check this option. This will disable the camera on the device.
- Click on the "Save and Publish" button at the bottom of the of the screen. You may need to scroll down to see the button.


NOTE: If you need to edit the Restrictions Profile, this is where you would come back to in order to do so.

ENROLL YOUR IOS DEVICE
You are now going to enroll your iOS device for use with the previously created Restrictions Profile.
Note: Checked out devices will likely have the AirWatch MDM Agent already installed so you may skip this step.
At this point, if using your own iOS device or if the device you are using does NOT have the AirWatch MDM Agent Application installed, then install the AirWatch Application.
To Install the AirWatch MDM Agent application from the App Store, open the App Store application and download the free "AirWatch MDM Agent" application.
 The first step is to make sure you know what your Organization GroupID is.
At this point, if using your own iOS device or if the device you are using does NOT have the AirWatch MDM Agent Application installed, then install the AirWatch Application.
To Install the AirWatch MDM Agent application from the App Store, open the App Store application and download the free "AirWatch MDM Agent" application.

- To find the Group ID, hover your mouse over the GroupID tab at the top of the screen. This may be shown in the form of the original email address used to create the sandbox.
- The GroupID will be displayed under the Organization Group name. The GroupID is required when enrolling your device.


Once the Agent has launched you can enroll the device. To do so, follow the below steps.
- For “Server”, enter "hol.awmdm.com".
- For “Group ID”, enter the Group ID for your Organization Group. This was noted previously in the "Enroll your iOS Device" step.
- Click the “Go” button.

- Type in the Basic User Account Username. Please note yours will likely be different than what is shown here.
- Type in the Basic User Account Password. This should be "VMware1!".
- Tap the "Go" button.

The AirWatch Agent will now redirect you to Safari and start the process of enabling MDM in the device settings.
Click on "Redirect & Enable" at the bottom of the screen.

Click on "Install" in the upper right corner of the Install Profile dialog box.

If you have a device PIN/Passcode already configured on the device you will be prompted at this point to enter your PIN/Passcode.
- Enter your device PIN.

iOS will pop up a profile installation screen, click the “Install” button.

iOS will pop up a warning about installing a MDM Profile. Click on "Install" in the upper right corner of the box.

You should now see the iOS request to trust the source of the MDM profile.
Click on "Trust" in the dialog box.

You should now see the iOS request to trust the source of the MDM profile.
Click on "Trust" in the dialog box.

You should now see the AirWatch Enrollment Success Screen.
NOTE: Due to the lab environment restrictions, there may be a pause at this point while enrollment occurs. If you DO NOT see this screen within a minute, please close and re-open the AirWatch Agent and re-start the AirWatch Enrollment.
Click the "Done" button at the top right corner of the window.

Press the device HOME button to return to the home screen on the iPad. Your device is now enrolled.
Notice the Camera,FaceTime, and Photo Booth applications are no longer visible on the device.
Continue on to the next step, "Un-Enroll Your iOS Device".

UN-ENROLL YOUR IOS DEVICE
You are now going to un-enroll the iOS device from AirWatch.
NOTE: The term "Enterprise Wipe" does not mean reset or completely wipe your device. This only removes the MDM Profiles, Policies, and content which the AIrWatch MDM Agent controls.
It will NOT remove the AirWatch MDM Agent application from the device.
It will NOT remove the AirWatch MDM Agent application from the device.
Enterprise Wipe will remove all the settings and content that were pushed to the device when it was enrolled. It will not affect anything that was on the device prior to enrollment.
To Enterprise Wipe your device,
NOTE: Your Device Friendly Name will very likely be different than what is shown. It will, however, be in the same location as shown on image in this step.
To Enterprise Wipe your device,
- Click on "Devices" in the left column then on
- Click on "List View" near the top of the second column (NOTE: Not under any of the sub menus in the second column).
- In the “List View”, click on the device friendly name to select the device and view the Device Details page.
NOTE: Your Device Friendly Name will very likely be different than what is shown. It will, however, be in the same location as shown on image in this step.

- Click on the upper “More” drop down at the top right of the screen.
- Click on “Enterprise Wipe” from under the "Management" menu.

- Enter your PIN in the boxes. You will not need to press enter or continue, the console will confirm your PIN showing "Successful" and then pop up the window showing that an Enterprise Wipe has been requested.
- Click "OK" on the popup.
- Open the AirWatch Agent application.
- Tap the "device" in the middle of the screen.
- Tap "Send Data" near the top of the screen. If this does not make the device check in and immediately un-enroll then continue to #4.
- If the above doesn't make it immediately un-enroll, then tap "Connectivity [Status]" under Diagnostics.
- Tap "Test Connectivity" at the top of the screen.
Feel free to continue to the "Force the Wipe" step to manually uninstall the AirWatch services from the device.

Press the HOME button on the device to go back to the home screen.
NOTE: The Camera, FaceTime, and Photo Booth applications should have re-appeared. Also note that the SCL application has been removed from the device along with the content that had been pushed to the device.
IF THE CAMERA, FACETIME, AND PHOTO BOOTH APPLICATIONS HAVE NOT RE-APPEARED, you didn't do anything wrong. Due to lab environment settings, it may just take some time for the signal to traverse through the various networks out and back to your device. Continue on to the next step to force the wipe if necessary.

To ensure the wipe is forced immediately, open the iOS Settings app.
- Navigate to GENERAL in the left column
- Select PROFILES.
- Open the MDM Profile.
- Select the red REMOVE button.
- Select REMOVE from the Remove Profile prompt pop-up.
- Enter your iOS Device Password and tap GO.

In the Same manner you can configure your Android, Windows and Symbian Mobile devices
For AirWatch Experience you can access the Lab HOL-MBL-1457 here on http://www.projectnee.com/HOL
Here are the Courses from VMware on AirWatch
No comments:
Post a Comment